One-Bowl Coconut Almond Granola

One Bowl Coconut Almond Granola | Image: Laura Messersmith

One Bowl Coconut Almond Granola | Image: Laura Messersmith

I think I’ve teased this recipe enough with various photos on social media and now it’s time to actually reveal what’s become essentially its own food group in our household. I’ve been tinkering with the ingredients and baking time and I can safely say that we’re addicted. It hasn’t come to marking how much is left in the mason jar before I leave the apartment, but we’re getting there.

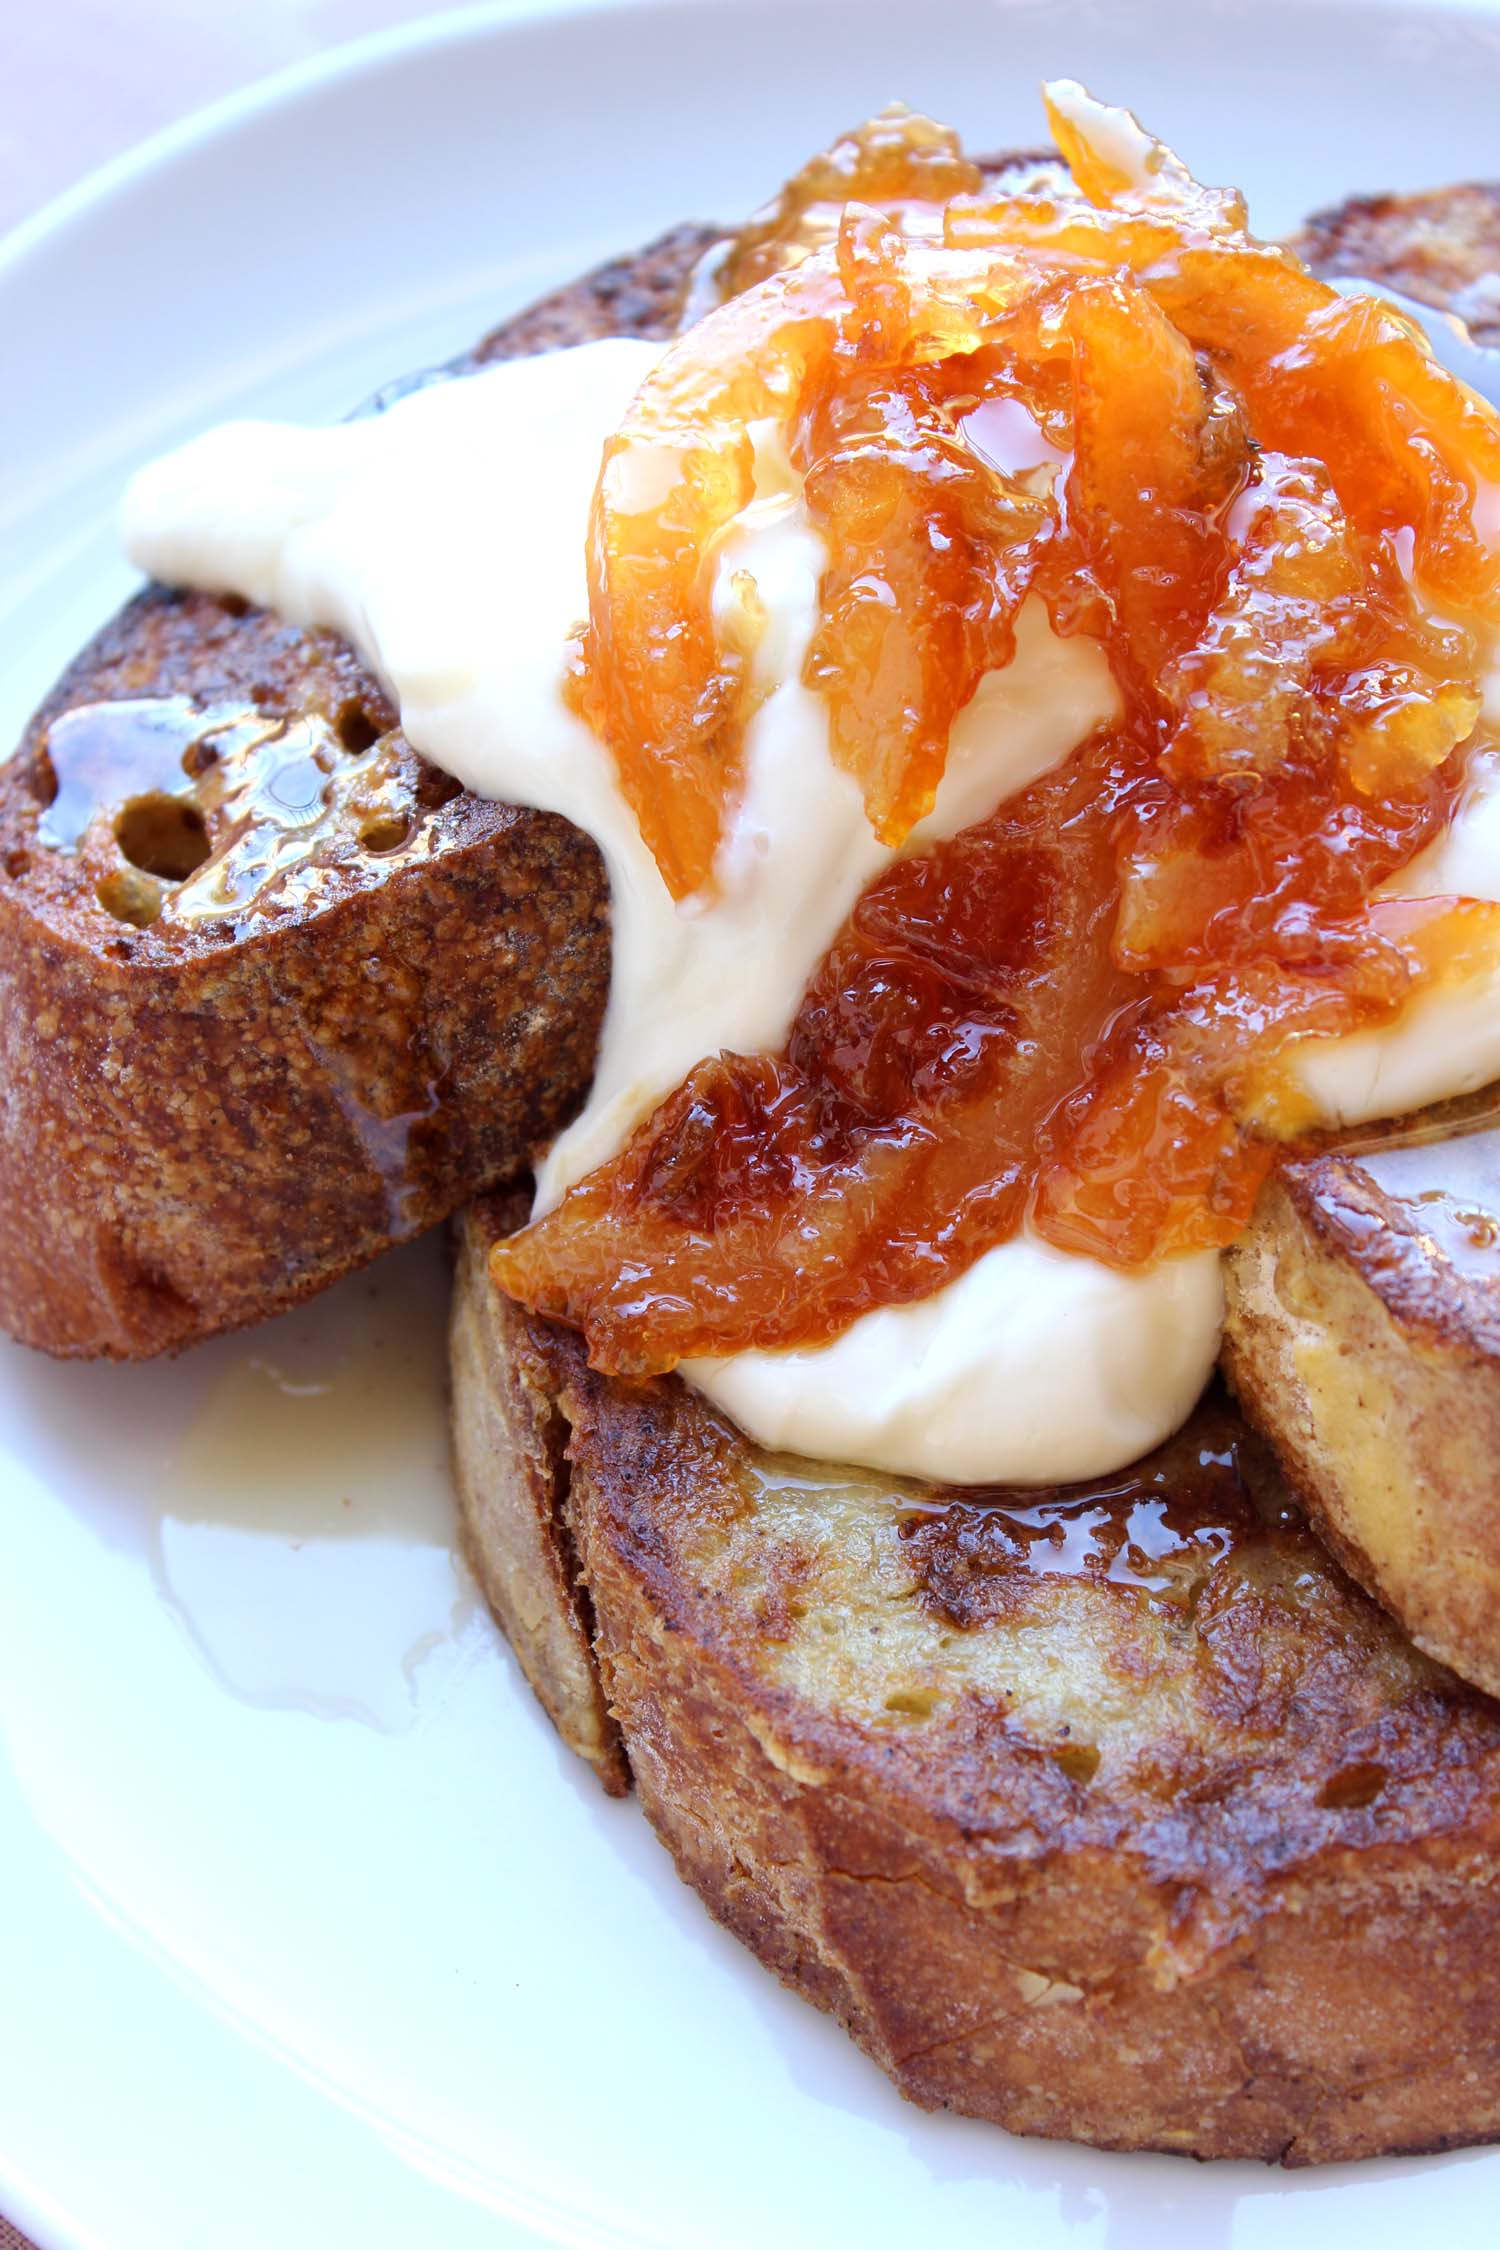
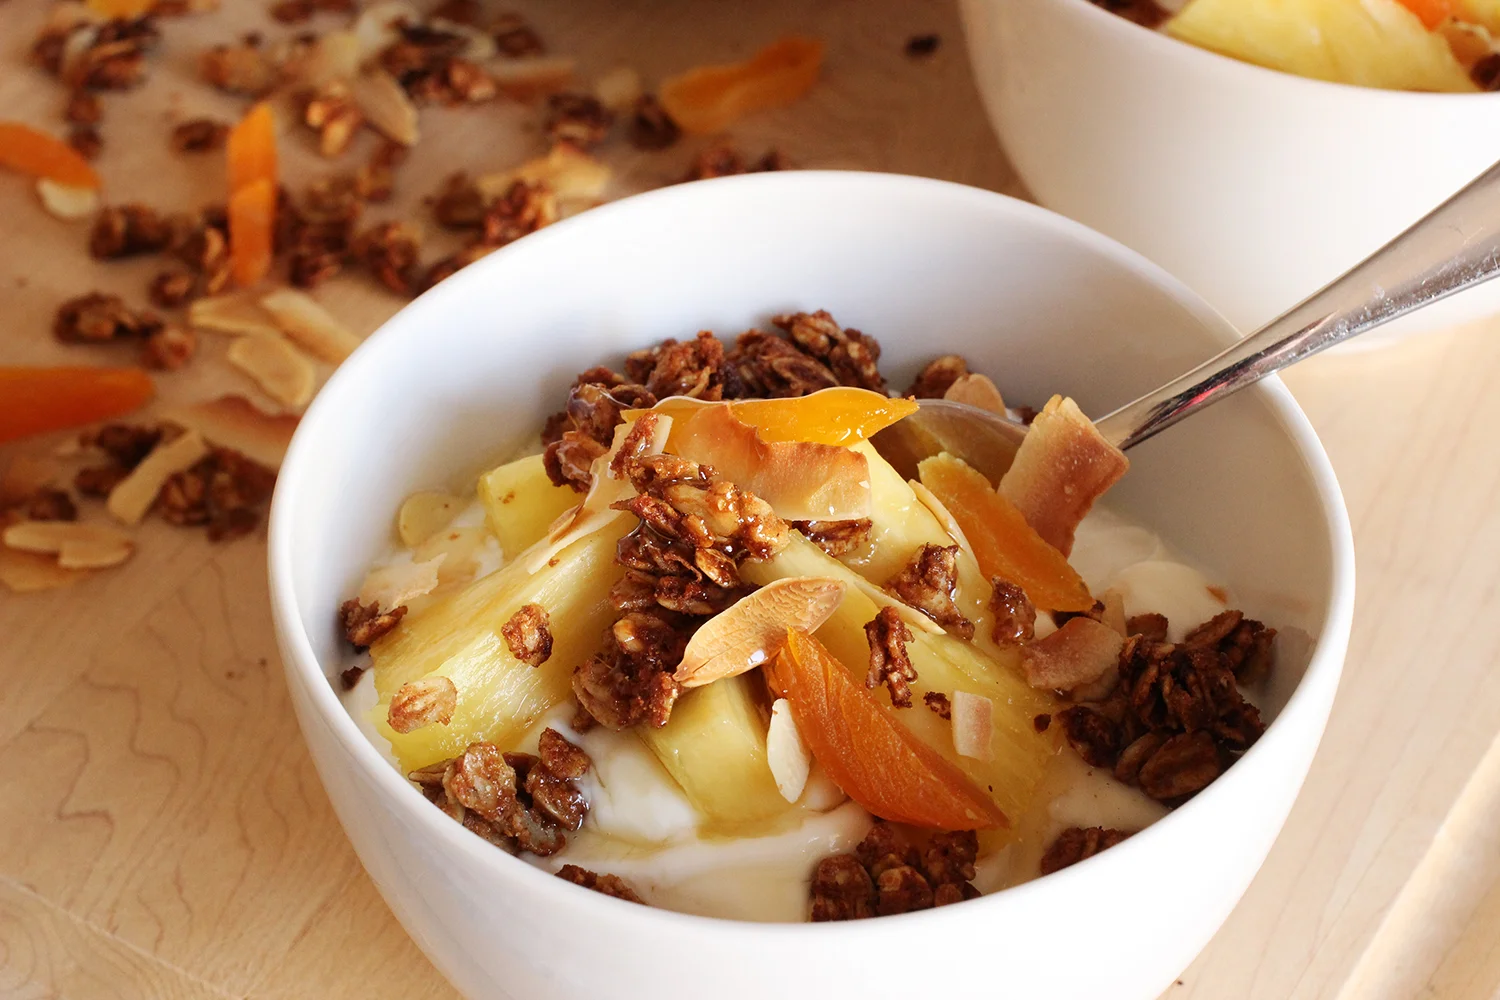
Yup, it tastes that good. Lightly sweet, plenty of crunch, lovely toasted coconut and flaked almonds. Excellent sprinkled over yogurt with a handful of blueberries or some pieces of fresh pineapple. What’s even better: all the ingredients can hang out in the pantry, no special trip to the grocery store required, and it only takes one bowl. So even when we’re reaching critically low levels we’re really only about 30 minutes away from a fresh batch.

One Bowl Coconut Almond Granola | Image: Laura Messersmith

One Bowl Coconut Almond Granola | Image: Laura Messersmith

One-Bowl Coconut Almond Granola (yield 2 1/2 cups)

Ingredients:
1 1/2 cups old-fashioned oats
1/4 cup vanilla whey protein powder
2 tablespoons lightly packed brown sugar
1 teaspoon ground ginger
1/2 teaspoon ground cinnamon
1/2 teaspoon salt
4 tablespoons pure maple syrup
3 tablespoons olive oil
1/2 teaspoon pure vanilla extract
1/3 cup raw sliced almonds
1/3 cup unsweetened flaked coconut
1/3 cup dried apricots, sliced

Instructions:
Place a rack in the center of the oven and preheat oven to 350 degrees F. Line a small rimmed baking sheet with parchment paper and set aside.

In a medium bowl, combine oats, vanilla protein powder, brown sugar, ginger cinnamon, and salt. (If you’re not into protein powder you can leave it out – just keep an eye on your baking times – or sub in whole wheat flour.)

Pour the olive oil, maple syrup, and vanilla extract onto the dry ingredients and stir until the oats are evenly coated and the granola is well mixed.

Spread the granola mixture in an even layer on the prepared rimmed baking sheet and bake at 350 degrees F. for 8 minutes. Remove from the oven, stir to break up the clusters and sprinkle the almonds evenly over the granola. Bake for another 8 minutes, again stirring before adding the flaked coconut. Bake for a final 6-8 minutes until the granola is golden brown.

Remove from the oven, the slide the parchment paper and granola onto a wire rack and allow to cool for about 10 minutes before adding the dried apricot pieces.

Allow the entire mixture to cool completely before storing or serving. Store in an airtight container at room temperature. Serve with vanilla greek yogurt and fresh fruit.

Adapted from Small Batch Granola by Joy the Baker.

One Bowl Coconut Almond Granola | Image: Laura Messersmith

One Bowl Coconut Almond Granola | Image: Laura Messersmith

Small Kitchen Friendly?
Absolutely. I used a medium mixing bowl, measuring cups and spoons, a rubber spatula, rimmed baking sheet, and a wire cooling rack. Parchment paper will prevent the granola from browning too quickly and helps with the cooling process.

The Verdict:
Our granola consumption has gone up 1000% since I started making my own. It’s just the right amount of sweetly spicy, the oats and almonds give it enough satisfying heft, and the apricots are pleasantly chewy. We often bring along a small container to jazz up a cup of yogurt, and it makes a parfait or dish of ice cream feel like a treat. I also love that the basic oat mixture is endlessly adaptable to what’s in the pantry, so expect more variations down the road.

One Bowl Coconut Almond Granola | Image: Laura Messersmith

One Bowl Coconut Almond Granola | Image: Laura Messersmith

Blood Orange Marmalade French Toast

Blood Orange Marmalade French Toast | Image: Laura Messersmith

Blood Orange Marmalade French Toast | Image: Laura Messersmith

Each week I follow along with Ina Garten (aka the Barefoot Contessa) and attempt to recreate one of her dishes in my tiny New York City kitchen. The catch? This is my version of cooking school and this week I’m making Blood Orange Marmalade for the first time. I’ll share both my successes and “challenges” along the way along with suggestions on how to adapt Ina’s recipe to a small kitchen.

Episode: “Say It With Food”

The Set-up: Ina’s helping her friend Cassandra make a gift basket of treats for her mother.

The Menu: Date Nut Spice Bread, Anna’s Orange Marmalade, Homemade Museli with Red Berries

0:45 – We’re mixing up the order as Ina shows us the finished gift basket – a wicker hamper stuffed to the brim with treats and wrapped in cellophane and raffia.

1:30 – Rewind! Now it’s the night before as we see all the effort that went into the gift starting with Date Nut Spice Bread, the star of the basket.

2:14 – Ina must have read my mind as she mixed the butter and sugar, followed by the eggs, 100% the same steps for any cake.

3:36 – She’s a master of layered flavors and this time it’s orange zest, liqueur, and juice to give the bread a strong note of citrus.

4:51 – Random Thought: when I squeeze oranges by hand the fresh juice always seems a bit thin and watery, I wonder if I should invest in a juicer to get more pulp involved…

5:07 – Dry ingredients are sifted together and then Pro Tip #1: add them alternately to the batter with the juice to keep the cake nice and light.

6:18 – Now that the batter is done it’s time to add the pecans and dates. I used to love dates, but now they’re a little too sweet for me. I have a feeling I’ll never make this bread unless I run across a devoted date lover someday.

7:29 – Okay, bread is in the oven. Pro Tip #2: a professional grade metal loaf pan will help get really crisp sides on the bread.

10:34 – The evening of prep continues with a batch of Anna’s Orange Marmalade. Ina finally pried the recipe out of her friend Anna Pump after years of buying jars at Loaves and Fishes.

11:42 – As you might have guessed, making orange marmalade requires a lot of thinly sliced oranges. Ina recommends just doing it with a sharp chef’s knife, the mandoline and food processor options don’t work as well.

12:19 – The oranges and lemons are in the pot with some water and later sugar. The process seems fairly straightforward but does involved heating and cooling the mixture at different intervals while the fruit cooks down.

13:27 – Marmalade is done and looking very New England pioneer in its canning jars and now it’s time to assemble the basket and Ina has some tips on how to make them look good.

14:54 –Step 1: Use a high quality basket, here she’s using a picnic hamper. Step 2: put some thing soft like raffia in as a base layer, then place a solid element, here it’s the Date Nut Spice Bread, in the center.

15:13 – Step 3: Fill in on either side with smaller items like the jars of Anna’s Orange Marmalade. Step 4: Soften the presentation by placing a bit more raffia in between the jars and add a few colorful items like lemon leaves and fresh fruit.

19:35 – Part 2 of the spice bread is orange scented cream cheese. The original idea was a cream cheese swirled bread, but after testing it “about 10 times” with little success Ina just decided to serve it on the side. Glad to know I’m not the only one who thinks of recipes that don’t work in practice!

20:58 – Cream cheese is done and packed in a ramekin for the basket, so now we switch over to Cassandra who’s making her way over to Ina’s house to pick up the basket.

21:20 – Last item for the basket: Homemade Museli with Red Berries which Ina describes as “a Swiss breakfast that’s really good for you, but usually tastes like the cardboard box it came in.” Oh snap. Also, super true, sorry muesli.

22:46 – Presumably, Ina is going to rescue muesli from it’s sad, bland state and make it worth eating. Mostly this seems to be taking place with the addition of honey and toasted hazelnuts, not a bad place to start.

26:29 – Now we’re getting both macerated berries and greek yogurt in the mix, which sounds pretty awesome to me.

27:02 – Ina layers the museli and greek yogurt in more canning jars and that’s the final touch on the basket of treats.

28:43 – The last step, wrap the entire basket in cellophane and tie it with a bright orange bow and wait for Cassandra to arrive.

29:55 – Cassandra initially claims responsibility for the basket, but the jig is up. Barbara could recognize a Barefoot Contessa production blindfolded. Meanwhile, Ina enjoying some toast with marmalade over the New York Times looking like the cat that ate the canary.

Final Thoughts:
Ina makes everything look so easy I could almost see trying to make a gift basket – coming soon to a special occasion near you!

Sadly, when I looked up this recipe I learned that Anna Pump passed away last fall, so it seems appropriate that her orange marmalade is bittersweet.

Cassandra is pretty ballsy to pretend she made that basket…

Blood Orange Marmalade French Toast | Image: Laura Messersmith

Blood Orange Marmalade French Toast | Image: Laura Messersmith

Lessons Learned:
One of the pitfalls of being citrus mad all through January is that eventually your fruit bowl is overflowing with lemons or blood oranges and come February you’ve worn out your welcome and no one can bear to eat another grapefruit segment. What’s a thrifty person to do? Cue: (Blood) Orange Marmalade!

I have never canned or preserved anything in my life (unless quick pickles count?) so frankly I was a little concerned and I learned a ton along the way.

Blood Oranges vs Navel – Since I had lots of blood oranges in the aforementioned fruit bowl and I like their sharper flavor I subbed them in, while simultaneously halving the recipe. They’re a bit smaller than a navel orange, so I went with a 2:1 ratio looking for about 4 generous cups of orange slices, plus the lemon. I like my marmalade pretty tangy and not overly sweet, so I left the sugar as is and I was pleased with the results.

Slicing Fruit – Contrary to Ina’s recommendation I did try to use a mandoline at first and found that either the blade on mine is really dull, or that citrus was just meant to be sliced by hand. I have since relegated that piece of kitchen equipment to the good-will since every time I’ve tried to use it the produce gets totally mangled. Just rock this out old school with a chef’s knife and a cutting board while you listen to a podcast or a beachy Spotify playlist.

Candy Thermometer – Most instant read thermometers won’t reach 220 degrees F and they’re tricky to use for this purpose since the stem isn’t very long. Boiling sugar is not to be trifled with, so this is an occasion when a $20 investment could save you a nasty burn. If you have trouble seeing the hashmarks on an analog model, then digital is the way to go.

Timing – Other than the slicing and jarring there really isn’t too much hands-on time, but it is the sort of recipe that requires several hours over the course of about a day to prepare. On the other hand, it will fill your kitchen and probably most of your home with a gorgeous orangy scent.

Canning Jars – Many people, including Ina recommend disinfecting the jars by running them through the dishwasher (no soap!) just before filling them. It’s definitely simpler than dealing with the pot of boiling water, tongs, etc.

Blood Orange Marmalade French Toast | Image: Laura Messersmith

Blood Orange Marmalade French Toast | Image: Laura Messersmith

Small Kitchen Friendly?
Actually, yes. I used a large pot, a chef’s knife, medium cutting board, 2 canning jars, a spatula, liquid and dry measuring cups, a large spoon, and a candy thermometer.

The Verdict:
As my tastes have changed I’ve really come around on marmalade’s bitter and sweet flavor, so this version of (Blood) Orange Marmalade was perfect for me. If you’re giving this as a gift your friends will definitely be impressed and if you’re looking for ways to use this fantastic concoction, may I suggest as a topping for a not-too sweet, might even please egg-lovers French Toast…?

Blood Orange Marmalade French Toast | Image: Laura Messersmith

Blood Orange Marmalade French Toast | Image: Laura Messersmith

Blood Orange Marmalade French Toast (serves 4-6)

Ingredients:
1 medium loaf crusty, French-style sourdough bread
3 large eggs
6 tablespoons whole milk
1/3 teaspoon ground cloves
3/4 teaspoon vanilla extract
1/4 teaspoon fine salt
3 tablespoons unsalted butter, divided

For Serving:
1 1/2 cups vanilla Greek yogurt (I like Chobani)
1/2 cup Blood Orange Marmalade
1/4 cup orange blossom honey

Instructions:
Pre-heat the oven to 350 degrees F.

Cut the bread into 12 (1-inch) slices and set aside. It’s okay and actually preferable if the bread is on the dry side, all the better to soak up the egg without getting soggy.

In a shallow bowl, whisk together the eggs, milk, cloves, vanilla, and salt until well combined.

Melt 1 tablespoon of the butter in a large non-stick sauté pan over medium heat.

Working one piece at a time, place the slices of bread in the egg, turning to coat both sides, and then into the hot pan.

Cook the French toast in batches over medium heat, don’t crowd the pan, for 3-4 minutes per side until the egg-coated bread turns golden brown and the edges begin to crisp.

Remove to a rimmed baking sheet and keep warm in the oven until ready to serve.

Add the remaining tablespoons of butter one at a time, as needed, to the pan before repeating the process with the remaining slices of bread.

Serve warm, and invite your guests to top with vanilla Greek yogurt, a spoonful of blood orange marmalade, and a drizzle of honey.

Small Kitchen Friendly?
You know it. You’ll need a large non-stick sauté pan, a rimmed baking sheet, shallow bowl, serrated knife, cutting board, and tongs (I find them easier than a spatula). Measuring spoons are helpful or you can eyeball it!

Blood Orange Marmalade French Toast | Image: Laura Messersmith

Blood Orange Marmalade French Toast | Image: Laura Messersmith

Orange Ricotta Scones with Vanilla Sea Salt

Orange Ricotta Scones with Vanilla Sea Salt | Image: Laura Messersmith

Orange Ricotta Scones with Vanilla Sea Salt | Image: Laura Messersmith

Winter has fully settled on New York and frankly it’s been a shock to my system. I’d love to go into hibernation mode and stay under the covers emerging only for BBC crime dramas on Netflix (we finished The Fall with Gillian Anderson and now I’ve moved on to Broadchurch. Slow build as we discover that many people in the small Dorset town have secrets!) and carb-based meals. Or Chipotle.

The next warmest option is to turn on the oven – a welcome blast of heat for my cold fingers – and bake something simple, comforting, and citrus based. For me that’s a batch of scones. They take enough effort so feel like I’m accomplishing something, but are so unfussy and rustic in presentation that they’re on the table in less than an hour.

I originally planned to re-create a wonderful lemon-ginger biscuit I had at the Ferry Terminal in San Francisco from Biscuit Bender (amazing with blueberry jam), but got side tracked thinking about other citrus + ginger combinations. I also realized I had a container of whole-milk ricotta in the fridge left over from another recipe and once I remembered the vanilla salt I made last month the wheels totally fell off that biscuit train.

Not to worry though, because these Orange Ricotta Scones totally deliver and because the biscuit train is never off the rails long around here.

Orange Ricotta Scones with Vanilla Sea Salt | Image: Laura Messersmith

Orange Ricotta Scones with Vanilla Sea Salt | Image: Laura Messersmith

Orange Ricotta Scones with Vanilla Salt (Yield: 12-16 Scones)

Ingredients:
2 1/2 cups all purpose flour
3 tablespoons granulated sugar
1 tablespoon baking powder
1/4 teaspoon salt
6 tablespoons cold butter, diced
1 large egg
3/4 cup whole milk ricotta, bought or homemade
1/4 cup whole milk
2 tablespoons orange zest, divided about 2 large oranges
1 1/4 cups confectioners sugar
2 teaspoons orange blossom honey
4-5 teaspoons orange juice
Vanilla Sea Salt (recipe here)

Instructions:
Preheat oven to 400 degrees F. Chill the baking sheets and ingredients in between steps.

In a large bowl combine the all purpose flour, granulated sugar, baking powder, and salt. Lightly toss the diced butter in the flour mixture to coat then using a pastry cutter, blend in the butter until the mixture resembles coarse crumbs. Set aside in the refrigerator.

In a large liquid measuring cup, combine 1 1/2 tablespoons of the orange zest with the egg, ricotta, and whole milk. Make a well in center of the flour mixture and add the ricotta mixture all at once, fork the wet and dry ingredients together until just combined. The dough will be a little shaggy at this point.

Turn the dough out onto a lightly floured surface. Gently fold the dough 8 to 10 times until dough pulls together. Pat into a rectangle about 1 inch thick and cut into squares or triangles.

Place the scones 2 inches apart on a parchment paper-lined baking sheet. Bake about 12-14 minutes or until lightly golden brown. Slide the parchment and scones onto a cooling rack.

While the scones are cooling, whisk together the confectioner’s sugar, honey, reserved orange zest and orange juice with a pinch of salt until smooth. Drizzle the icing over the cooled scones, sprinkle with a little vanilla sea salt, and serve!

Written with reference to Food + Wine’s Glazed Lemon Ginger Scones and Better Homes and Garden’s Strawberry Shortcake Scones.

Orange Ricotta Scones with Vanilla Sea Salt | Image: Laura Messersmith

Orange Ricotta Scones with Vanilla Sea Salt | Image: Laura Messersmith

Small Kitchen Friendly?
Yes, totally. I used a large mixing bowl, pastry cutter, 2 cup-size liquid measuring cup, dry measuring cups and spoons, a microplane grater, paring knife, and a dinner fork. I also needed a small bowl, small spoon, two rimmed baking sheets, a bench scraper, and parchment paper.

The Verdict:
These are definitively scones, not biscuits thanks to the ricotta and sugar, but are also just very lightly sweet when un-iced. During my experiments I tasted them plain, with a bit of honey, iced only, and iced + vanilla salt – all were delicious in their own way, so choose what you like best. The ricotta keep the dough tender and its very mild flavor allows the sweet orange come through as the elegant star of the whole affair. Pair with a cup of tea and an Agatha Christie novel.

Orange Ricotta Scones with Vanilla Sea Salt | Image: Laura Messersmith

Orange Ricotta Scones with Vanilla Sea Salt | Image: Laura Messersmith

Challah Cinnamon Rolls

Challah Cinnamon Rolls | Image: Laura Messersmith

Challah Cinnamon Rolls | Image: Laura Messersmith

One of the (many) benefits of marriage is experiencing familiar holidays through a different lens, trying on traditions that have been built over years, and at times contributing my own twist. Mike’s family has a long-standing tradition of marking special occasions with sticky buns acquired from a local, family-owned farm stand and bakery.

After I saw this recipe for No Knead Challah Cinnamon Rolls on the wonderful site Apt 2B Baking Co. written by the very talented Yossy Arefi (who else is super excited for her cookbook to be released in the spring!?) I started to wonder if I could replicate our usual breakfast treat, but one formed by my own hands. And what better time to make something special than for Christmas morning when a little extra effort is worth it?

Challah Cinnamon Rolls | Image: Laura Messersmith

Challah Cinnamon Rolls | Image: Laura Messersmith

I made challah during my bread baking class last winter and with a successful try at Deb Perelman’s Better Chocolate Babka earlier this fall I was feeling confident in my abilities. The simplicity of the ingredients – nearly everything listed is probably in your refrigerator or pantry right now – and the no-knead (aka no stand mixer) process means that this recipe truly requires very little other than the ability to measure, mix, and fold a little dough. There are zero fancy techniques or unusual pieces of equipment required. Perfect for cooking in an unfamiliar kitchen and a great starter recipe for the inexperienced bread baker.

But, I’m burying the lede: these cinnamon rolls are DELICIOUS and I can’t think of a more heavenly way to start the day, especially while they’re still warm out of the oven. I know Christmas is over, but the New Year is coming and with these cinnamon rolls 2016 would be off to a pretty spectacular start...

Challah Cinnamon Rolls | Image: Laura Messersmith

Challah Cinnamon Rolls | Image: Laura Messersmith

No-Knead Challah Cinnamon Rolls (yield: 12 cinnamon rolls)

Dough Ingredients:
4 cups bread flour
1 1/2 teaspoons active dry yeast
2 teaspoons fine sea salt
2 large eggs plus 1 large egg yolk at room temperature
1 egg white for egg wash
3/4 cup warm water
1/3 cup olive oil
1/4 cup honey

Filling Ingredients:
4 tablespoons unsalted butter, melted
1/3 cup granulated sugar
2 tablespoons ground cinnamon
pinch salt
Non-stick spray, for prepping the baking dish

Glaze Ingredients:
2 cups confectioner's sugar
1/3 cup sour cream
1 teaspoon vanilla extract
pinch salt
2-3 teaspoons whole milk, as needed

Mid-Day or Afternoon Before: Mixing & Folding the Dough
In a large bowl, whisk together the bread flour and sea salt. In a separate smaller bowl whisk together the eggs, honey, and olive oil. Set both aside while you proof the yeast. Place the warm water and active dry yeast in a measuring cup and stir together gently. Allow the yeast and water to sit at room temperature for 5-10 minutes until you see a foamy layer form on the top of the water, then the yeast is ready.

Stir both the yeast and honey mixtures into the flour with a rubber spatula until a wet, sticky dough forms. Cover the bowl with plastic wrap and rest at room temperature for 10 minutes.

Now begins the folding process, which you will perform five times at 30 minute intervals. Folding develops the gluten in the bread and gives it structure which allows it to trap air and rise when baked.

To fold the dough, peel back the plastic wrap and take hold of an edge folding it into the center and pressing down lightly with your fingers. Turn the bowl and repeat folding small pieces of the dough into the center for eight turns and folds total. It will look like a messy origami star. Then flip the dough so that the folds and seams are on the bottom. Cover the bowl tightly with the plastic, and let sit for 30 minutes at room temperature.

Repeat the all-around folding, flipping, covering, and resting four more times. Setting a timer in between and writing the steps on the plastic wrap, checking off each one as you go, will help keep the process moving and make sure you don’t miss a step or wait too long between folds.

The dough is sticky and doesn’t hold its shape especially well in the first stages, but trust that it will become firmer and more elastic allowing you to make proper folds in the later turns. By the final fold, the dough will be stretchy and you’ll see some small air bubbles.

After the fifth and final fold, reseal the plastic and place the bowl in the refrigerator overnight. Between 16-24 hours is ideal, any longer risks over-proofing the dough and will lead to flat, dense rolls. The over night resting time allows the yeast to slowly develop flavor in the dough and the volume will nearly double in size.

Early the Next Morning: Forming & Filling
Prepare a 9 x 13-inch baking dish with a light layer of non-stick spray.

Stir the sugar, cinnamon, and salt together in a small bowl. On a lightly floured surface roll the dough into an 18 x 12 inch rectangle about 1/2 inch thick. Leave a 1/2 inch border along one of the longer sides of the dough (this will be the outside seal of the roll) and brush the melted butter over the rest of the surface all the way to the edges. Sprinkle the cinnamon sugar over the butter.

Brush the 1/2 inch border left bare with a small amount of egg wash from the reserved egg white. Then roll the dough up into a tight log starting from the opposite long side toward the egg wash border. When the log is formed, lightly press the egg washed edge down and turn the log so that the seam is resting on the board.

Use a sharp knife to slice the log into 12 pieces about 1 1/2 inches wide and arrange them in the baking dish cut sides up spacing them evenly in the dish so that each has room to rise and spread.

Cover the baking dish with a dry kitchen towel and let the rolls rise at room temperature until puffy and almost doubled in size, about 2 hours.

Mid-Morning: Baking & Glazing
Position a rack in the center of the oven and preheat to 350 degrees F. Bake the rolls until golden and cooked through, about 25-30 minutes.

While the rolls are cooling, whisk the confectioner’s sugar, sour cream, vanilla extract, and salt in a medium bowl. Add the milk one teaspoon at a time until the glaze reaches your desired consistency, you’re looking for thick but pourable.

Drizzle the glaze over the warm cinnamon rolls and enjoy immediately.

Very lightly adapted from Apt 2B Baking Co.’s No Knead Challah Cinnamon Rolls by Yossy Arefi, which is adapted from Jessica Fechtor’s Five Fold Challah recipe in her book Stir.

Challah Cinnamon Rolls | Image: Laura Messersmith

Challah Cinnamon Rolls | Image: Laura Messersmith

Small Kitchen Friendly?
100% which is amazing. I used a large mixing bowl, medium mixing bowl, liquid measuring cup, dry measuring cups and spoons, and a rubber spatula to mix the dough. To bake and glaze I used a rolling pin, small bowl, pastry brush, bench scraper (or chef’s knife), 9 x 13 inch baking dish, and small spoon. Plastic wrap, a permanent marker, and a clean kitchen towel round out your kit. Use a ruler too if you want to be precise with your rolling and cutting.

The Verdict:
When I took the cinnamon rolls out of the oven all thoughts of food photography flew out of my head, and frankly I’m lucky there were any left by the time we were finished with breakfast. I had to abscond with the one cinnamon bun in these photos to snap some quick photos or risk having no evidence except a few crumbs and traces of glaze in the baking dish, which would have been an accurate statement about their deliciousness. The dough bakes up to a gentle crunch on the outside while maintaining that fluffy stretch inside; the cinnamon is warm but not too spicy, and the glaze, kept in check by its sour cream base, sweetens the whole concoction. Incredible.

Challah Cinnamon Rolls | Image: Laura Messersmith

Challah Cinnamon Rolls | Image: Laura Messersmith