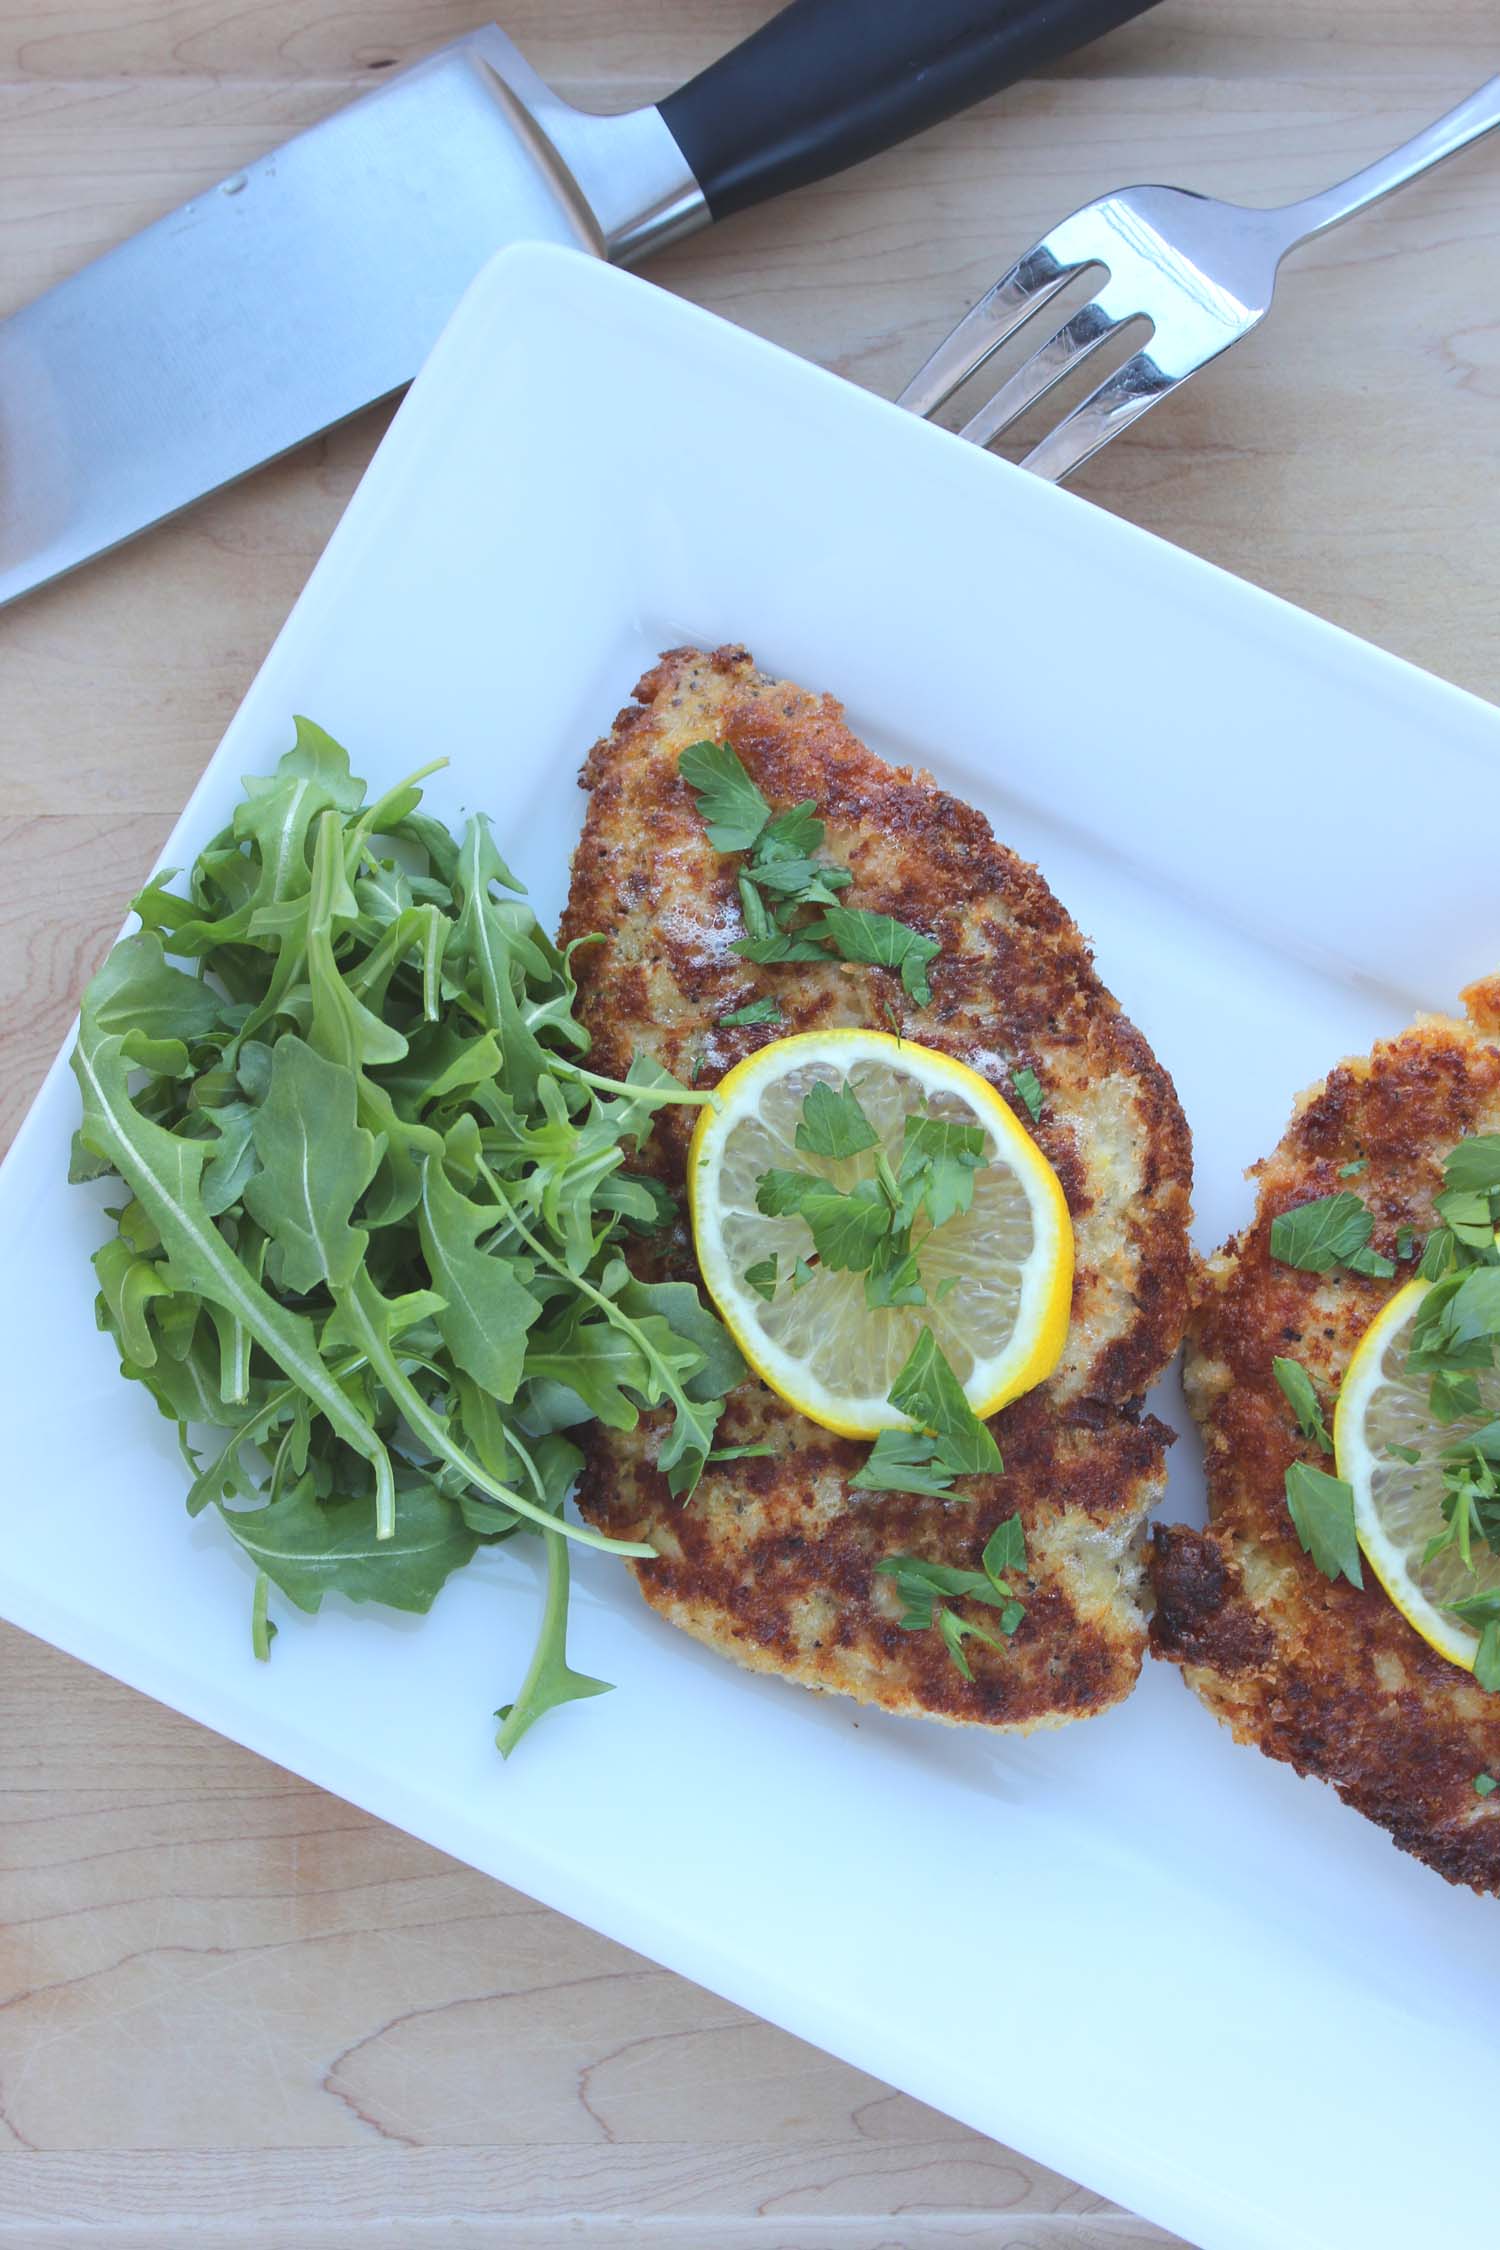
Chicken Piccata

Chicken Piccata | Image: Laura Messersmith

Chicken Piccata | Image: Laura Messersmith

Each week I follow along with Ina Garten (aka the Barefoot Contessa) and attempt to recreate one of her dishes in my tiny New York City kitchen. The catch? This is my version of cooking school and I’m making these recipes for the first time. I’ll share both my successes and um, challenges, along the way and we’ll see if I can keep up with the Contessa!

Episode: “It’s Friday Night Again”

The Set-up: Ina is trying to jazz up the usual Friday night chicken with a new menu.

The Menu: Chicken Piccata, Buttermilk Mashed Potatoes, Herb Roasted Onions, Apple and Pear Crisp

0:45 – It just occurred to me how similar this menu is to the episode I watched last week - I must have chicken, mashed potatoes and apple desserts on the brain!

1:10 – We’re starting off with the Apple and Pear Crisp as Ina extolls the virtues of Fuji apples and Bosc pears. (Firm, crisp, flavorful)

2:19 – A gentle scolding from Ina for the fruit pressers out there – stop leaving an imprint of your thumb in all the pears! (subtext)

3:32 – I’m glad to hear that Ina calls that sticky pie filling stuff “goo” – a woman after my own heart, because what other word really works?

4:26 – Crunchy oatmeal streusel topping time – mmmmm. Not to toot my own horn, but this one from my Apple Spice Coffee Cake is an all time favorite.

5:53 – Ina is using diced cold butter, but the resulting clumps of topping almost make it seem like it was partially softened. How does she get that texture? Maybe by using the mixer?

6:45 – Out in the garden to collect some blue muscari, bulbs and all, for decorating the table.

7:04 – Ina recommends following the design principle of grouping things in threes, so she has three vases of flowers.

10:17 – Maybe this is too retro, but I think Ina’s goal of making home, especially dinner, welcoming for Jeffrey after a long week on the road. If I were spending most of my time in airports I’d want something cozy waiting too.

11:38 – Onward to the Herb Roasted Onions. Once I “discovered” roasting a few years ago it quickly became my favorite way to transform vegetables from sort of “meh” when boiled to amazing.

12:26 – She’s upping the ante on these onions by tossing them in a mustard thyme vinaigrette before roasting. Brilliant.

13:02 – A quick glimpse of Mr. Garten zipping along on his drive home before we’re back to make Buttermilk Mashed Potatoes.

14:35 – Pro Tip#1: Heat the milk and butter before adding to the mashed potatoes, but DON’T heat the buttermilk, or it will curdle.

15:44 – Dinner is 75% there, last but not least: Chicken Piccata.

20:39 – I really dislike breading things, but I have a feeling these will be worth it.

21:23 – Watching Ina’s technique and I noticed she keeps a “clean hand” and a “dirty hand” to prevent contamination – filing that one away.

22:50 – I am determined to master crispy sautéing – so tricky to get the oil just right!

23:08 – Mr. Garten arrives as the chicken goes into the oven to finish cooking. Perfect timing!

26:22 – The cork on some white wine has been popped (hellooo weekend!) and Ina is making the lemon sauce for the Chicken Piccata.

27:01 – Chicken, lemon, white wine – oh my goodness this has my name all over it.

28:57 – Finishing touch time – a little leftover marinade on the onions, a spoonful of lemon sauce on the chicken, a spoonful of buttermilk mashed potatoes. So hungry just watching.

29:46 – Over the Apple and Pear Crisp that lured Jeffrey into the kitchen he says he wishes there was more than one Friday night in a week. Adorable! 

Chicken Piccata | Image: Laura Messersmith

Chicken Piccata | Image: Laura Messersmith

Final Thoughts:
Tossing vegetables in a vinaigrette sounds like an awesome way to up the ante on roasting.

Just realized that Ina has some favorite combinations – chicken + mashed potatoes + apple dessert = happy husband.

Lord, I just love how sweet Ina and Jeffrey are after 40(?) years of marriage.

Lessons Learned:
Even though Chicken Piccata is a relatively simple dish there's still a ton to learn while making it.

Oil Temperature – I’ve been trying to master browning bread crumbs for some time now, but I always seem to either burn them immediately because the oil is too hot, or they stay pale and greasy because the oil is too cold. Heat the oil on medium for 2-3 minutes until it shimmers a little in the pan, just a slight ripple in the surface before adding the chicken and reduce to medium-low if it seems like it’s browning too quickly.

Breading – I admit, I misread the recipe and used Panko bread flakes instead of bread crumbs. Thankfully they work just fine! I also tried the technique of chilling the breaded chicken on a plastic wrap lined baking sheet before sautéing and found that my coating didn’t budge (even when left over night.) This step also makes it possible to do most of the prep ahead of time and cook the chicken just before serving. Booyah.

Portion Size – This is sometimes tricky, but if you can buy chicken breasts or cutlets that are on the smaller side, say 3-4 ounces each, or cut larger ones in half. Mainly because once they’re pounded flat they get quite a bit bigger and can mess with your cooking time. Learned that the hard way with Parmesan Chicken. With the smaller size at 1/4 – 1/2 inch thick I found that the cooking time (2 minutes per side, plus about 10 minutes in the oven) was perfect.

Chicken Piccata | Image: Laura Messersmith

Chicken Piccata | Image: Laura Messersmith

Small Kitchen Friendly?
Fairly, assuming you have three or four large plates. I used a rolling pin to flatten the chicken), four dinner plates, a baking sheet, one medium sauté pan, a small cutting board, a chef’s knife, metal spatula, and both dry and liquid measuring cups and spoons. An instant read meat thermometer will also give you peace of mind.

The secret weapon of this recipe: clear plastic wrap. It turns your counter into another plate or prevents contaminating a clean plate with chicken. Second runner up: parchment paper. Such a help with clean up and it seems to encourage crisping during the baking stage.

The Verdict:
When Mike and I first sat down for dinner to Chicken Piccata neither of us were that hungry for some reason and I foolishly suggested that we just share one. But, after the first bite of these crispy, golden pieces of chicken we both found that we had bigger appetites than we originally thought – suddenly sharing seemed ridiculous! The breading was crispy, the chicken juicy, the lemon lovely and tart against the richness of the olive oil. Seriously good. Please make this!

Chicken Piccata | Image: Laura Messersmith

Chicken Piccata | Image: Laura Messersmith

Modern Meatloaf

Modern Meatloaf | Image: Laura Messersmith

Modern Meatloaf | Image: Laura Messersmith

I love trying new restaurants and experiencing new flavor combinations, but sometimes you just want something really simple and down-home. Tangent alert: where does that phrase ‘down-home’ come from? What’s more straightforward and Better Homes & Gardens-esque than meatloaf? There’s a reason that people (including me) love meatloaf and I think it goes back to family dinner and wanting to channel that un-fussy, deliciousness “just like Mom used to make.”

That said, I also like to cook in a way that still trends healthy and incorporates great flavor. So, when I first saw this recipe in Cooking Light I was really excited to try a version of meatloaf that includes vegetables and is made with lean ground beef.

I started with the original, but then as I’ve made these mini-meatloaves over and over again I’ve adapted them to our taste and worked out what I think is the perfect balance of flavor, fat, and binding agent. I’m confident that these truly bring an American classic up to date with delicious results.

Extra bonus: you can easily reduce the recipe by half if you have a smaller group, or make the mixture ahead of time, keep it in the refrigerator, and bake the meatloaf just before you’re ready to serve. 

Modern Meatloaf | Image: Laura Messersmith

Modern Meatloaf | Image: Laura Messersmith

Modern Mini-Meatloaf (yield: 12 meatloaves; serves: 6)

Ingredients:
1 cup (1 medium) finely chopped onion
1/2 cup (1 medium) finely chopped carrot
1/4 cup (1 stalk) finely chopped celery
1 1/2 teaspoon (2 cloves) garlic, minced
1 tablespoon olive oil
1 cup ketchup, divided
2 tablespoons spicy brown mustard
2 teaspoon Worcestershire sauce, divided
1 teaspoon dried oregano
1 teaspoon kosher salt
1/4 teaspoon freshly ground black pepper
1 1/2 pounds lean ground beef (I like 90% or 93% lean)
2 large eggs
1 1/4 – 1 1/2 cups unseasoned panko bread flakes
Non-stick spray

Instructions:
Pre-heat the oven to 350 degrees.

Mince the onion, carrot, celery, and garlic finely. Heat the olive oil in a large non-stick sauté pan over medium-high heat. Add the onion, carrot, celery and 1 teaspoon kosher salt to the pan and reduce the heat to medium. Rub the dried oregano between your hands and add to the pan. Sauté for about 4 minutes until the vegetables begin to soften. Next, add the minced garlic and cook for one more minute.

Turn off the heat and stir in 1/2 cup ketchup, the spicy brown mustard, Worcestershire sauce, and black pepper into the vegetables. Allow the mixture to cool. In a small bowl whisk the eggs and set aside.

Place the ground beef in a medium mixing bowl and add the sautéed vegetables and sauce to the bowl. Use a fork to mix the sauce into the ground beef until well mixed. Add the whisked eggs and continue to mix with the fork until well combined.

Finally, stir in the panko bread crumbs starting with 1 1/4 cups, if using 93% lean ground beef, and adding up to 1 1/2 cups if using 85% or 90% lean ground beef. In a separate small bowl stir together the remaining 1/2 cup ketchup with 1 teaspoon Worcestershire sauce.

Lightly coat two muffin tins with non-stick spray. Divide the ground beef mixture into 12 equal portions and roll into balls (about the size of a racquetball) - don’t over pack the mixture. Gently press each portion into the muffin tins and spread each mini-meatloaf with 1 teaspoon of the ketchup Worcestershire mixture.

Bake at 350 degrees for 20-25 minutes until lightly browned, or until an instant-read meat thermometer registers 160 degrees. Let stand for 5 minutes.

Adapted and re-written from Cooking Light.

Modern Meatloaf | Image: Laura Messersmith

Modern Meatloaf | Image: Laura Messersmith

Small Kitchen Friendly?
Yes. I used a medium non-stick sauté pan, two muffin tins, one medium mixing bowl, and one small bowl. I also used a medium cutting board, chef’s knife, measuring cups and spoons, a rubber spatula, and a fork.

The Verdict:
This is one of our favorite comfort food meals – perfect with a little mashed potato and roasted Brussels sprouts or green peas. The flavor of the meatloaf is deeply savory – hello Worcestershire sauce and onions. But he best part in Mike’s book is the extra surface area means that each portion gets its own helping of the tangy ketchup topping and gently browned edges.

Modern Meatloaf | Image: Laura Messersmith

Modern Meatloaf | Image: Laura Messersmith

Deep Dish Apple Pie

Deep Dish Apple Pie | Image: Laura Messersmith

Deep Dish Apple Pie | Image: Laura Messersmith

Each week I follow along with Ina Garten (aka the Barefoot Contessa) and attempt to recreate one of her dishes in my tiny New York City kitchen. The catch? This is my version of cooking school and I’m making these recipes for the first time. I’ll share both my successes and um, challenges, along the way and we’ll see if I can keep up with the Contessa!

Episode: “Sweet Home Supper”

The Set-up: Ina invited Michael the Flustered Florist ™ for a dinner inspired by the comfort food of his Pennsylvania childhood.

The Menu: Oven Fried Chicken, Sour Cream Mashed Potatoes, Green Salad with Blue Cheese Dressing, Deep Dish Apple Pie

0:44 – Ina kicks off this episode with Oven Fried Chicken and I am excited to see how she manages crispy chicken without a ton of frying oil.

1:30 – Oh dear, step one involved breaking down a whole chicken. Perhaps some day I’ll be as blasé about butchering as Ina is, but not yet…

2:26 – Step 2: marinate the chicken in buttermilk to tenderize. Why is buttermilk only sold in quarts? I literally never need that much, ever.

3:18 – Quick check in with Michael at the shop and he’s playing his role of “Flustered Florist” to the hilt. Give this man an Emmy!

4:09 – We’re back with Ina as she starts the pastry for Deep Dish Apple Pie. She correctly identifies pie crust as the top source of baking anxiety. Count me among the intimidated.

5:42 – Ina’s Pro Tips for pastry success include: 1. Very cold ingredients (butter, vegetable shortening, ice water). 2. Use the food processor on pulse to cut in the butter. 3. Chill the dough for 30 minutes before rolling.

9:11 – Now that the dough is resting we’re moving on to make the dressing for Green Salad with Blue Cheese Dressing, which mainly involves pureeing Roquefort (obvi) and mayonnaise in the food processor.

10:37 – Ina doesn’t say this, but I’ll bet the flavors in the blue cheese dressing improve if it’s made ahead of time.

11:36 – Onward to make the pie filling for Deep Dish Apple Pie! This is something else I struggle with, no matter how many apples I put in it always seems to cook down. Keeping a close eye on this step…

12:25 – Back to see what Michael the Flustered Florist ™ is up to – mainly covert delivery operations to patios and front stoops across the Hamptons.

13:53 – The Moment of Truth! Pie crust rolling time. Ina shares a few more Pro Tips for pie crust success: 1. A well-floured surface. 2. Keep moving the dough as you roll to make sure it isn’t sticking. 3. Use the rolling pin to help move the dough into the pie plate. 4. Ease the dough into the pie plate, don’t stretch! 5. Use a little water to re-seal any cracks.

15:45 – Ina calls this “mile-high apple pie” and she’s not kidding – I’d guess her filling is about 1.5 – 2 inches above the edge. Filing that away for later…

16:01 – Finishing touches are on – egg wash + a sprinkling of sugar to make the crust brown and a little shiny. Yum!

18:49 – Now for the frying of the chicken, which involves my least favorite cooking prep process: flouring the buttermilk soaked chicken pieces. Eww.

19:13 – Even Ina can’t quite mask her disgust over her flour-encased fingers. This is the reason Shake N’ Bake was invented.

20:56 – Chicken fryin’ time. This the other reason I never make fried chicken – what to do with all that oil?

21:48 – Pie is out of the oven, chicken is in the oven, and next Ina is making the Sour Cream Mashed Potatoes.

22:24 – Ina has heated the milk and butter on the stove before she adds them to the mashed potatoes - brilliant.

23:30 – Now for the sour cream and the seasonings. I bet the tang of the sour cream in the potatoes pairs beautifully with the buttermilk in the chicken preparation.

26:19 – Final prep on Green Salad with Blue Cheese Dressing.  Ina’s play on a traditional wedge salad uses green leaf lettuce instead of iceberg. Good move.

27:07 – Ina’s solve for lettuce too big for a salad spinner is to whip it around in a kitchen towel which sprinkles her entire kitchen with droplets of water. Probably one of my all-time favorite moments.

28:32 – Well, we can trace the heirloom tomato craze back to at least 2005 when this episode first aired – Ina’s recommending them for this salad.

29:12 – Michael the Flustered Florist ™ has arrived and he and Ina are driving right into a supper that looks so, so good.

30:00 – PS: for folks following along at home – Ina’s pie did not fall in the middle and I swear I can smell the apples and spices through the TV. My stomach is growling.

Final Thoughts:
Ina has such a knack for transforming old-fashioned recipes into something fresh.

I really need to make pie – after my dessert class a few weeks ago and now this episode it’s time.

If I were coming to dinner at Ina's after a hard day my menu would definitely involve chocolate cake.

Deep Dish Apple Pie | Image: Laura Messersmith

Deep Dish Apple Pie | Image: Laura Messersmith

Lessons Learned:
Deep Dish Apple Pie it had to be done. I dug out my copy of Barefoot Contessa Family Style, rolled up my sleeves and prepared to make both the pie crust and the filling. If I had to identify my two major areas of “opportunity” I’d say rolling the crust and portioning the filling. I always seem to end up with a wonky shape and pies that seem really full, but then fall after they cool. Not life ending, but annoying when you’ve put in so much effort.

Alas, even though I followed the recipe to a T, I still fell a little short of where I wanted to be.

I’d chalk that up to two factors:

1. Not enough water in the pie crust. A careful observer will notice that the edge of my pie is missing in one section – that’s because it literally cracked a little and fell off during baking. I’d noticed when I was rolling out the dough that it felt a little dry and was prone to splitting a little, but it didn’t seem excessive, so I let it ride. Rookie mistake.

2. Not enough apples in the filling. I piled them up to what I thought was a crazy height and they still cooked down quite a lot resulting in a concave top. Rats.

Luckily, neither of these issues are insurmountable, but both have inexperience as their underlying cause – if I made pie more often it almost certainly would have been obvious where there were some areas for improvement before I actually baked it.

Deep Dish Apple Pie | Image: Laura Messersmith

Deep Dish Apple Pie | Image: Laura Messersmith

Small Kitchen Friendly?
Sort of. I needed a food processor, dry and liquid measuring cups, a butter knife and plastic wrap for the dough. For the filling I added a large bowl, chef’s knife, peeler, microplane zester, large cutting board, and wooden spoon to the mix. And, of course a pie plate. Parchment paper and a baking sheet will help with clean up.

The Verdict:
I made Deep Dish Apple Pie for a New Year’s Eve dinner with friends. Since we’re on the same page about trying new recipes, I knew it was okay to bring something I’d never made before. I hate to sound ungrateful by complaining about apple pie, but I’m not sure that this one quite hit the mark. The crust was good, but the filling was overly tart – too much lemon with not enough sugar balancing it out.  As result it was great with vanilla ice cream, but on it’s own…. In the end, I’m not sure that I’d make this particular version again, but it’s definitely not going to stop me from trying to find the perfect recipe or developing one of my own. That just means more PIE!

Deep Dish Apple Pie | Image: Laura Messersmith

Deep Dish Apple Pie | Image: Laura Messersmith

Roasted Root Vegetable, Leek and Bacon Frittata

Roasted Root Vegetable, Leek, & Bacon Frittata | Image: Laura Messersmith

Roasted Root Vegetable, Leek, & Bacon Frittata | Image: Laura Messersmith

Well, it’s January again, 2015 is underway, and resolutions are in full effect. Mike and I took advantage of our four-hour drive back to the city from Upstate after Christmas to talk through the coming year and think about what we’d like to accomplish. We both resolved to be healthier this year, so I’ve been thinking about ways to incorporate more vegetables into our meals.

I’ve also been in the mood for warm, cozy recipes and to me there’s pretty much nothing cozier or more perfect for grey winter days than roasted root vegetables. Frittata is one of my all-time favorite things to make for both brunch and dinner (other examples here and here) and this one uses a mixture of carrots, parsnips, and sweet potatoes lightly caramelized in the oven. The root vegetables are then pared with sautéed leeks, onions and thyme to combine the rich savoriness of the vegetables with fresh green flavors. A sprinkle of salty, crispy bacon balances everything out. Yum!

This recipe is the best of both worlds – it tastes so good and doesn’t leave me with a sense of deprivation – healthy eating I can get behind. And, you know it's good when I offer Mike a taste and he goes back for a second bite.

Roasted Root Vegetable, Leek, & Bacon Frittata | Image: Laura Messersmith

Roasted Root Vegetable, Leek, & Bacon Frittata | Image: Laura Messersmith

Roasted Root Vegetable, Leek and Bacon Frittata (serves 6-8)

Ingredients:
1/2 cup (1 medium) parsnips
3/4 cup (2 medium) carrots
1 1/4 cups (2 small) sweet potatoes
1 cup (2 small) yellow onions
1 1/2 cups (3 medium) leeks
8 large eggs
1/3 cup 2% milk
2 strips thick cut bacon
1 1/2 teaspoons minced fresh thyme leaves
3 tablespoons kosher salt, divided
1 tablespoon freshly ground black pepper, divided
1/4 cup olive oil, divided
Non-stick spray (optional)

Instructions:
Pre-heat the oven to 400 degrees.

Peel and dice the parsnips, carrots, and sweet potatoes into 1 inch pieces to make about 2 generous cups of root vegetables. Spread evenly on a parchment paper-lined baking sheet and toss with 1 1/2 tablespoons olive oil, 2 teaspoons kosher salt, and 3/4 teaspoon freshly ground black pepper. Roast at 400 degrees for 25-35 minutes, or until easily pierced with a fork, turning halfway through the cooking time. Set aside.

After the root vegetables are cooked, reduce the oven temperature to 350 degrees. Place the two strips of thick-cut bacon on a baking sheet and bake for 20 minutes, turning midway, until crisp. Drain the bacon on a paper towel and allow to cool slightly before mincing into 1/4 inch pieces - this will make about 1/3 cup of bacon.

While the bacon cooks, prep the onions and leeks. Remove the tough, dark green ends and the root from the leeks and cut the remaining white and light green stalk in half lengthwise. Rinse thoroughly with water to remove any sand. Dice the leeks into 1/4 inch strips and the onions into 1/4 inch pieces. In a large sauté pan or non-stick skillet, heat 3 tablespoons of olive oil over medium-low heat and cook the leeks, onions, 1 1/2 teaspoons minced fresh thyme, 1 teaspoon kosher salt, and 1/2 teaspoon black pepper until translucent, about 10 minutes.

Once the onions and leeks are softened, add the roasted root vegetables and minced bacon to the sauté pan and stir to evenly combine. Spread the vegetable mixture in a 9 inch glass pie plate that has been coated in a light layer of non-stick spray.

Beat the eggs, 2% milk, 1/4 teaspoon kosher salt, and 1/4 teaspoon black pepper in a medium mixing bowl. Pour the eggs over the vegetable mixture in the pie plate. The vegetables should be nearly, but not entirely covered.

Bake at 350 degrees for 35-40 minutes, or until the eggs are set and the top of the frittata is lightly browned. Jiggle the pie plate slightly to check – if nothing moves the frittata is done. Allow to cool about 5 minutes before serving.

Roasted Root Vegetable, Leek, & Bacon Frittata | Image: Laura Messersmith

Roasted Root Vegetable, Leek, & Bacon Frittata | Image: Laura Messersmith

Small Kitchen Friendly?
Fairly. I used two baking sheets, one large sauté pan, one medium mixing bowl, a medium cutting board and a 9 inch pie plate. I also used a chef’s knife, wooden spatula, whisk, vegetable peeler, liquid measuring cups and measuring spoons. Lining the baking sheets with parchment paper will also be helpful with clean up.

The Verdict:
Honestly, I surprised myself with this recipe - to be honest, I was a little nervous about how it would turn out. Mike and I both really liked the balance of sweetness from the root vegetables with the savory flavors of the bacon and leeks. Mike says he’d eat frittata all the time, and we would both absolutely eat this frittata again. I served it with vinaigrette dressed arugula leaves and the combination makes this frittata a strong contender for brunch or for dinner.

Roasted Root Vegetable, Leek, & Bacon Frittata | Image: Laura Messersmith

Roasted Root Vegetable, Leek, & Bacon Frittata | Image: Laura Messersmith