Company Pot Roast

Company Pot Roast | Image: Laura Messersmith

Company Pot Roast | Image: Laura Messersmith

Each week I follow along with Ina Garten (aka the Barefoot Contessa) and attempt to recreate one of her dishes in my tiny New York City kitchen. The catch? This is my version of cooking school and I’m making these recipes for the first time. I’ll share both my successes and um, challenges, along the way and we’ll see if I can keep up with the Contessa!

Episode: “Comfort and Company”

The Set-up: Ina is re-testing some classic recipes and updating them for company.

The Menu: Company Pot Roast, Baked Potatoes with Yogurt and Sour Cream

0:27 – First step of Company Pot Roast: haul out the biggest pot in the house! That is seriously a giant Le Creuset French oven.

1:11 – Pro Tip #1: Pat the roast dry with paper towels to help it sear in the pot.

2:34 – I love a two-fer - Pro Tip #2: After seasoning, dredge the roast in flour – the light coating browns the meat and thickens the sauce.

3:25 – Ina lets one of her secrets for making this company-ready: she’s stealing some inspiration from Beef Bourgignon. Which if you think about it is basically the same dish, just fancied up.

4:16 – Ina keeps a notebook near by when she’s testing recipes to keep track of what she’s doing, a practice I whole-heartedly endorse. If I can’t remember what I did, how can I recreate it?

5:48 – Need a suggestion for the Company Pot Roast extra sauce? Ina uses it to make pasta Bolognese.

6:02 – This is a classic stew/soup/braise combo: onion, carrot, celery, garlic, leeks. Yum!

7:16 – The plot thickens! Ina is going to be home alone and doesn’t need an entire pot roast, so she’s calling her friend Dwyer (who’s in the depths of a kitchen remodel) to see if she’d like dinner. Naturally the answer is “yes.”

10:47 – Apparently if you want to terrify Ina just invite her to a really stiff, formal dinner with starched napkins and hard chairs. Actually that does sound unappealing…

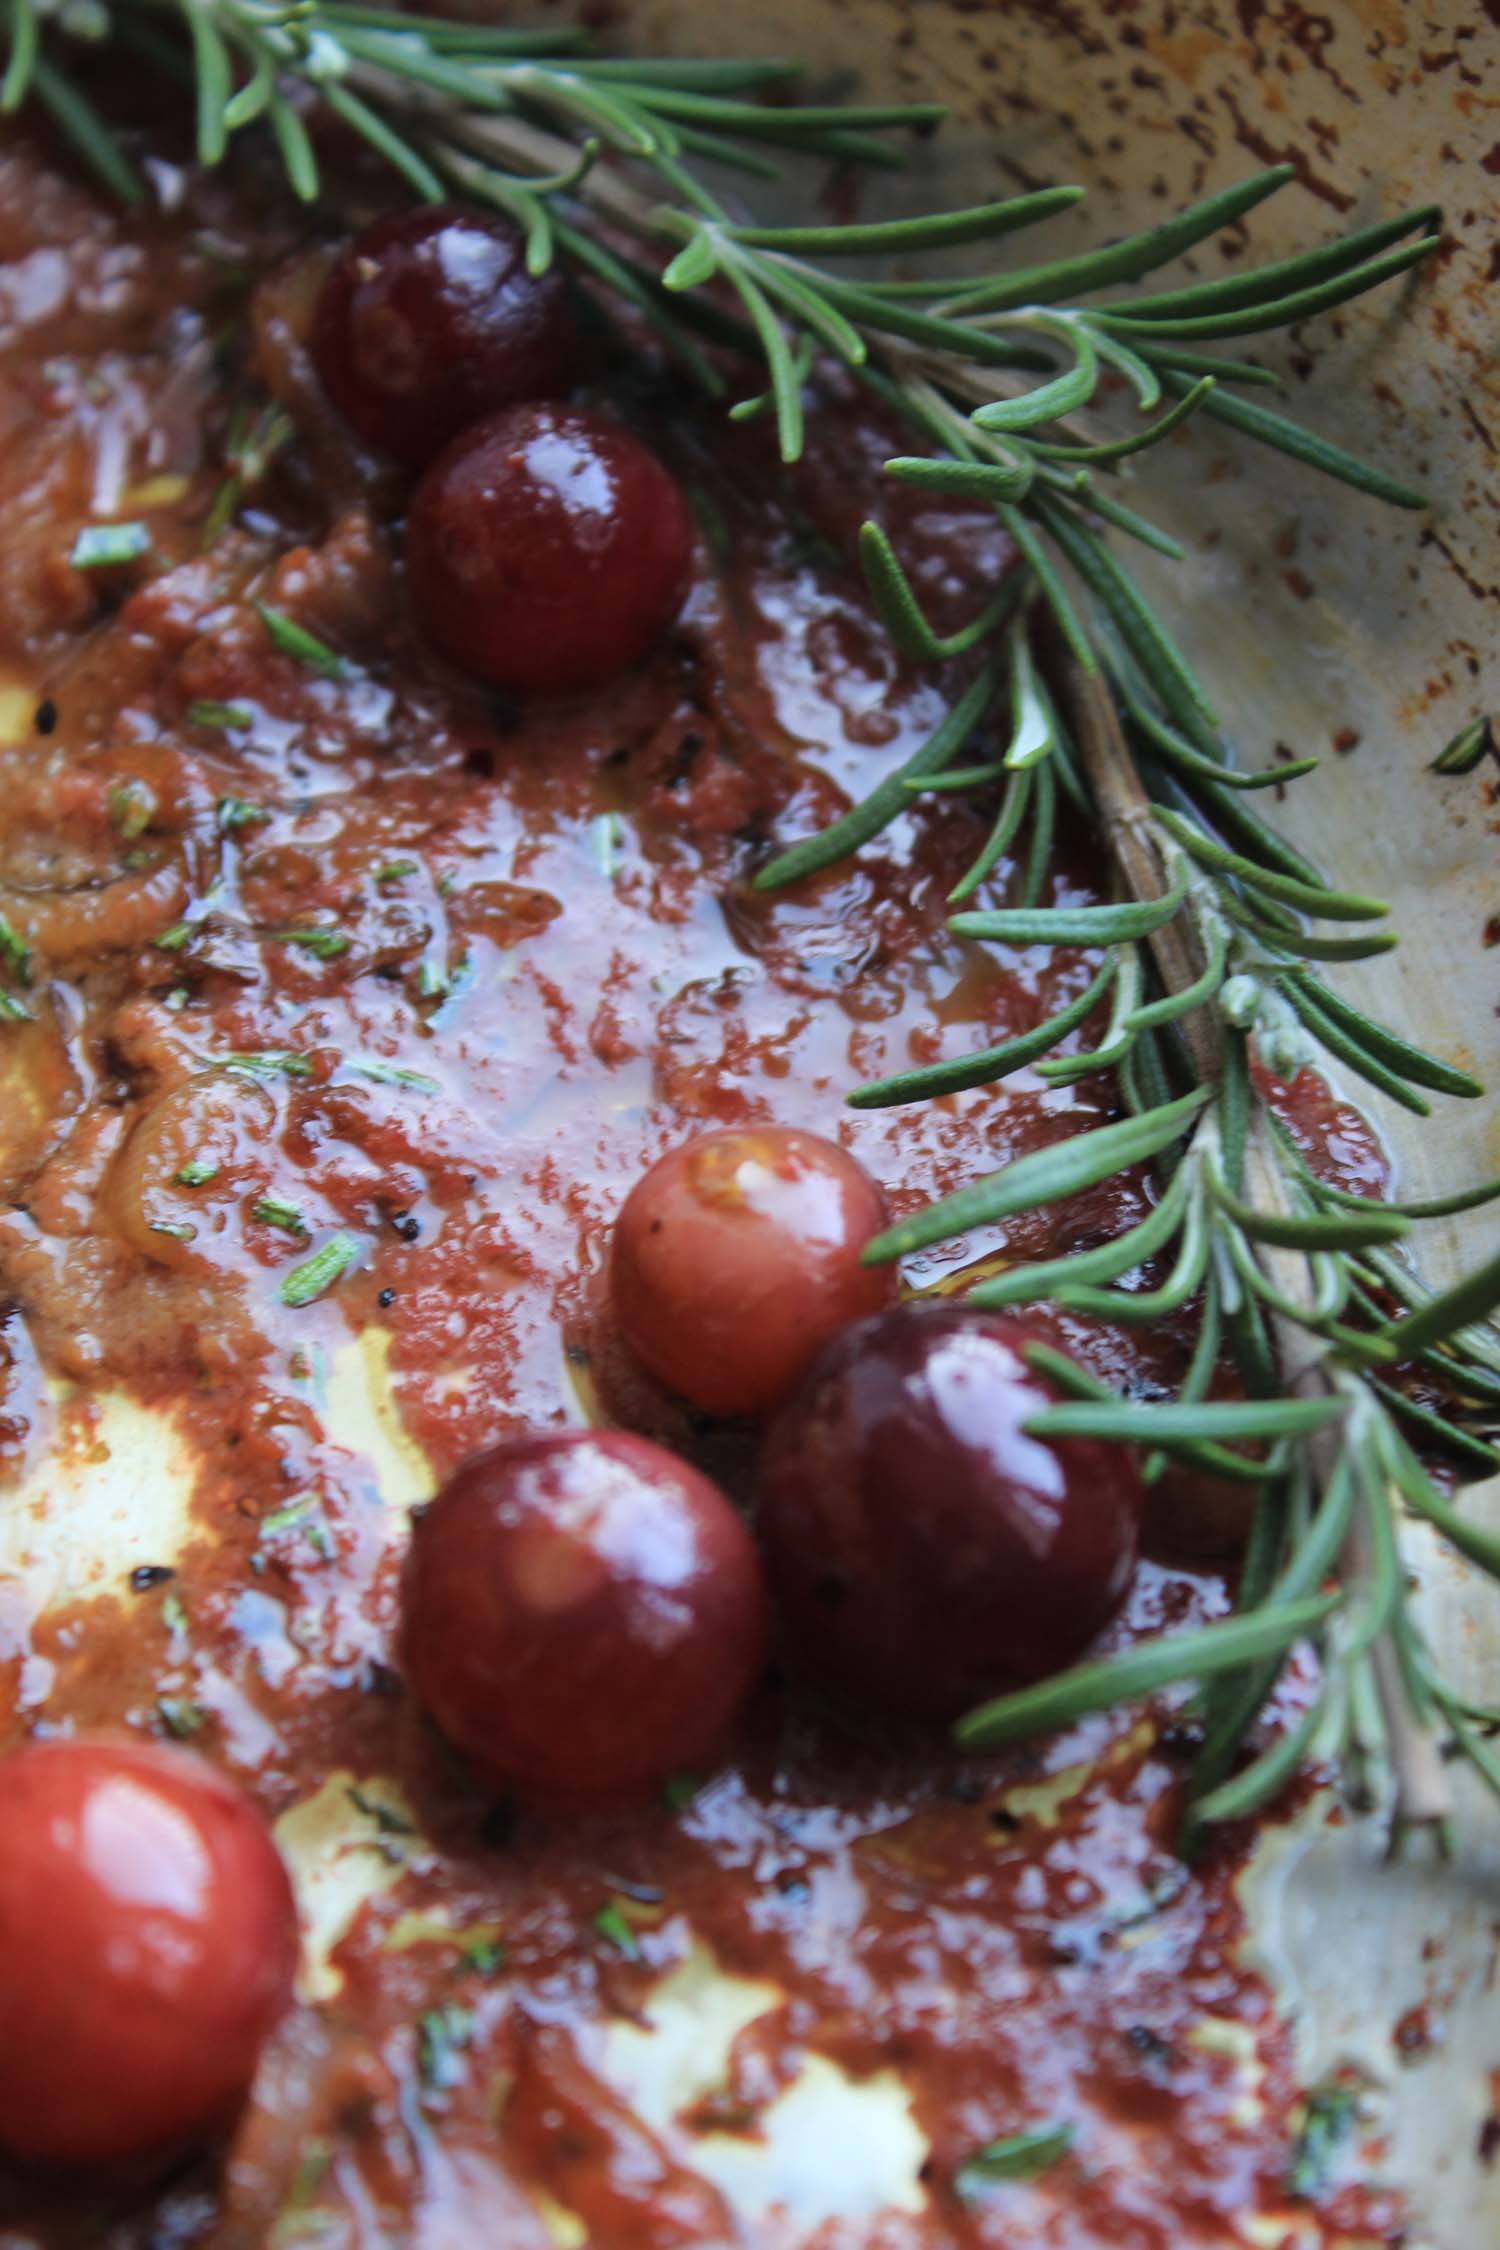
11:22 – Now for the bouquet garni of rosemary and thyme fresh from the garden and tied with kitchen twine.

12:28 – In goes the Burgundy - she really is drawing on beef Bourgignon - cognac, tomatoes, and chicken stock. And (!) something really old-fashioned: a bouillon cube!

13:10 – Dwyer the lucky duck is now jetting around town buying flowers for Ina as a thank you. So sweet!

14:28 – Pot roast is in the oven to bubble away for a few hours. I love hands-off cooking!

18:39 – On to the Baked Potatoes with Yogurt and Sour Cream and Ina is using baking potatoes – specifically russets.

19:02 – Pro Tip #3: Potatoes bake better if the skins are dry before they go in the oven. I never knew that!

20:35 – These are some seriously no-fuss potatoes – no foil, no olive oil, not even pierced with a fork! – just placed right on the oven rack at 350 degrees.

21:41 – Dwyer continues to plan a thank you for Ina by picking up Chinese take-out for dinner. If you’re curious, she orders General Tso’s Chicken with Broccoli and white rice – I assume this is Ina’s usual?

22:53 – Pro Tip for the Ages: “You can make something really simple, but if it’s beautifully presented it makes all the difference in the world.” I’m trying to incorporate that into so many areas of life!

26:16 – Why choose chunky or pureed sauce for Company Pot Roast when you can have both?

27:03 – Pro Tip #4: Mashing the flour into softened butter prevents lumpy sauce. This is one of my all time favorite tricks.

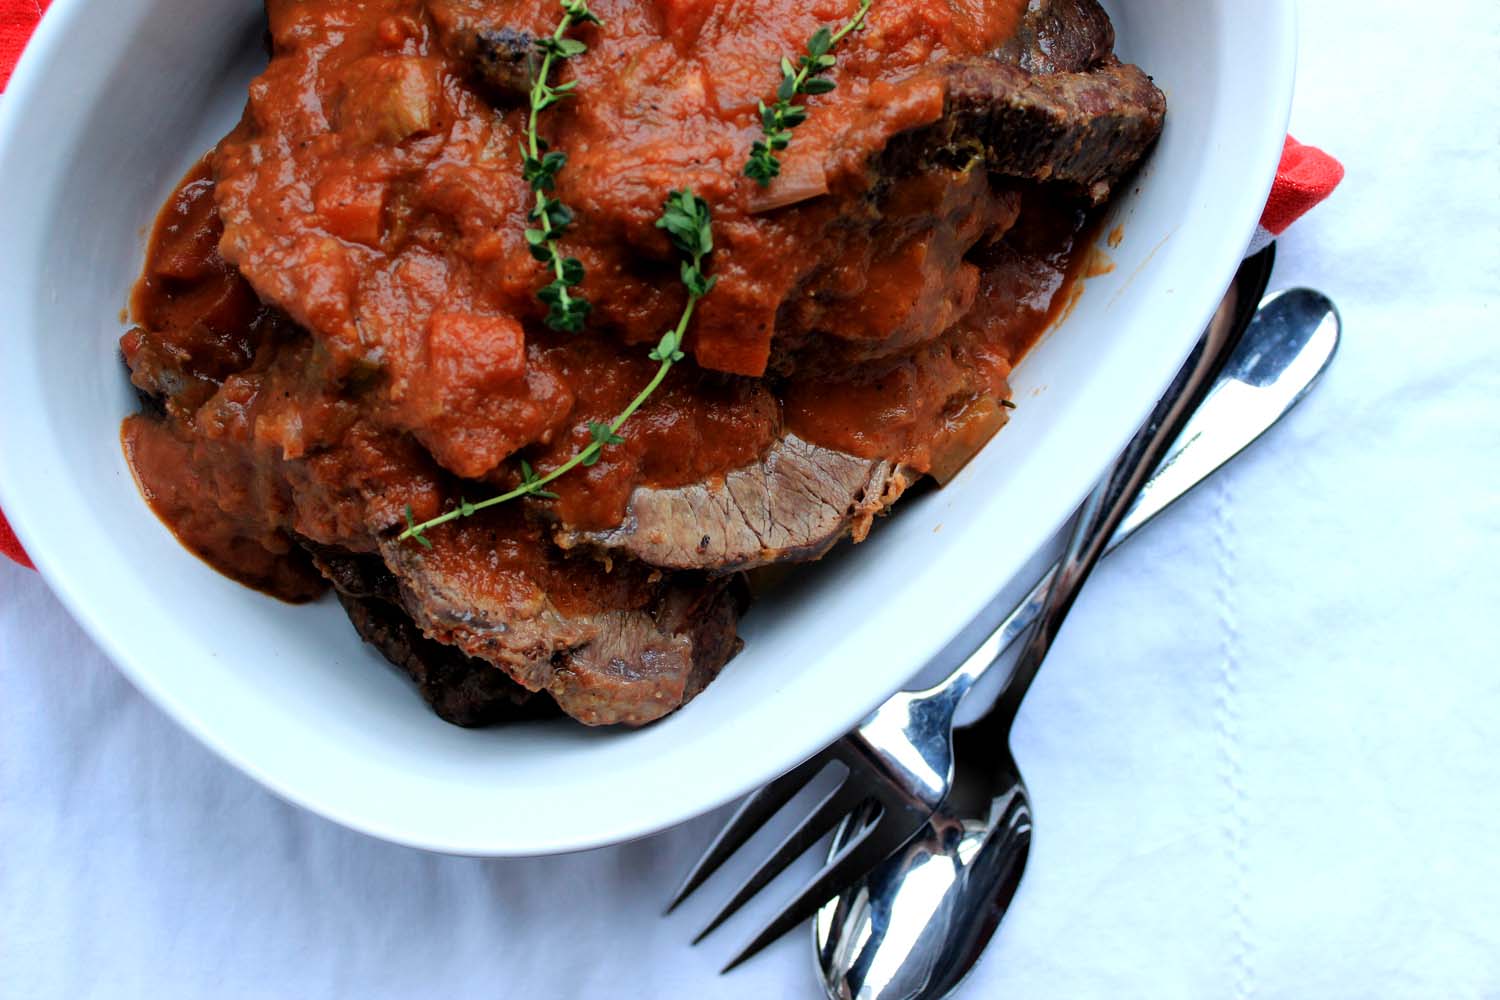
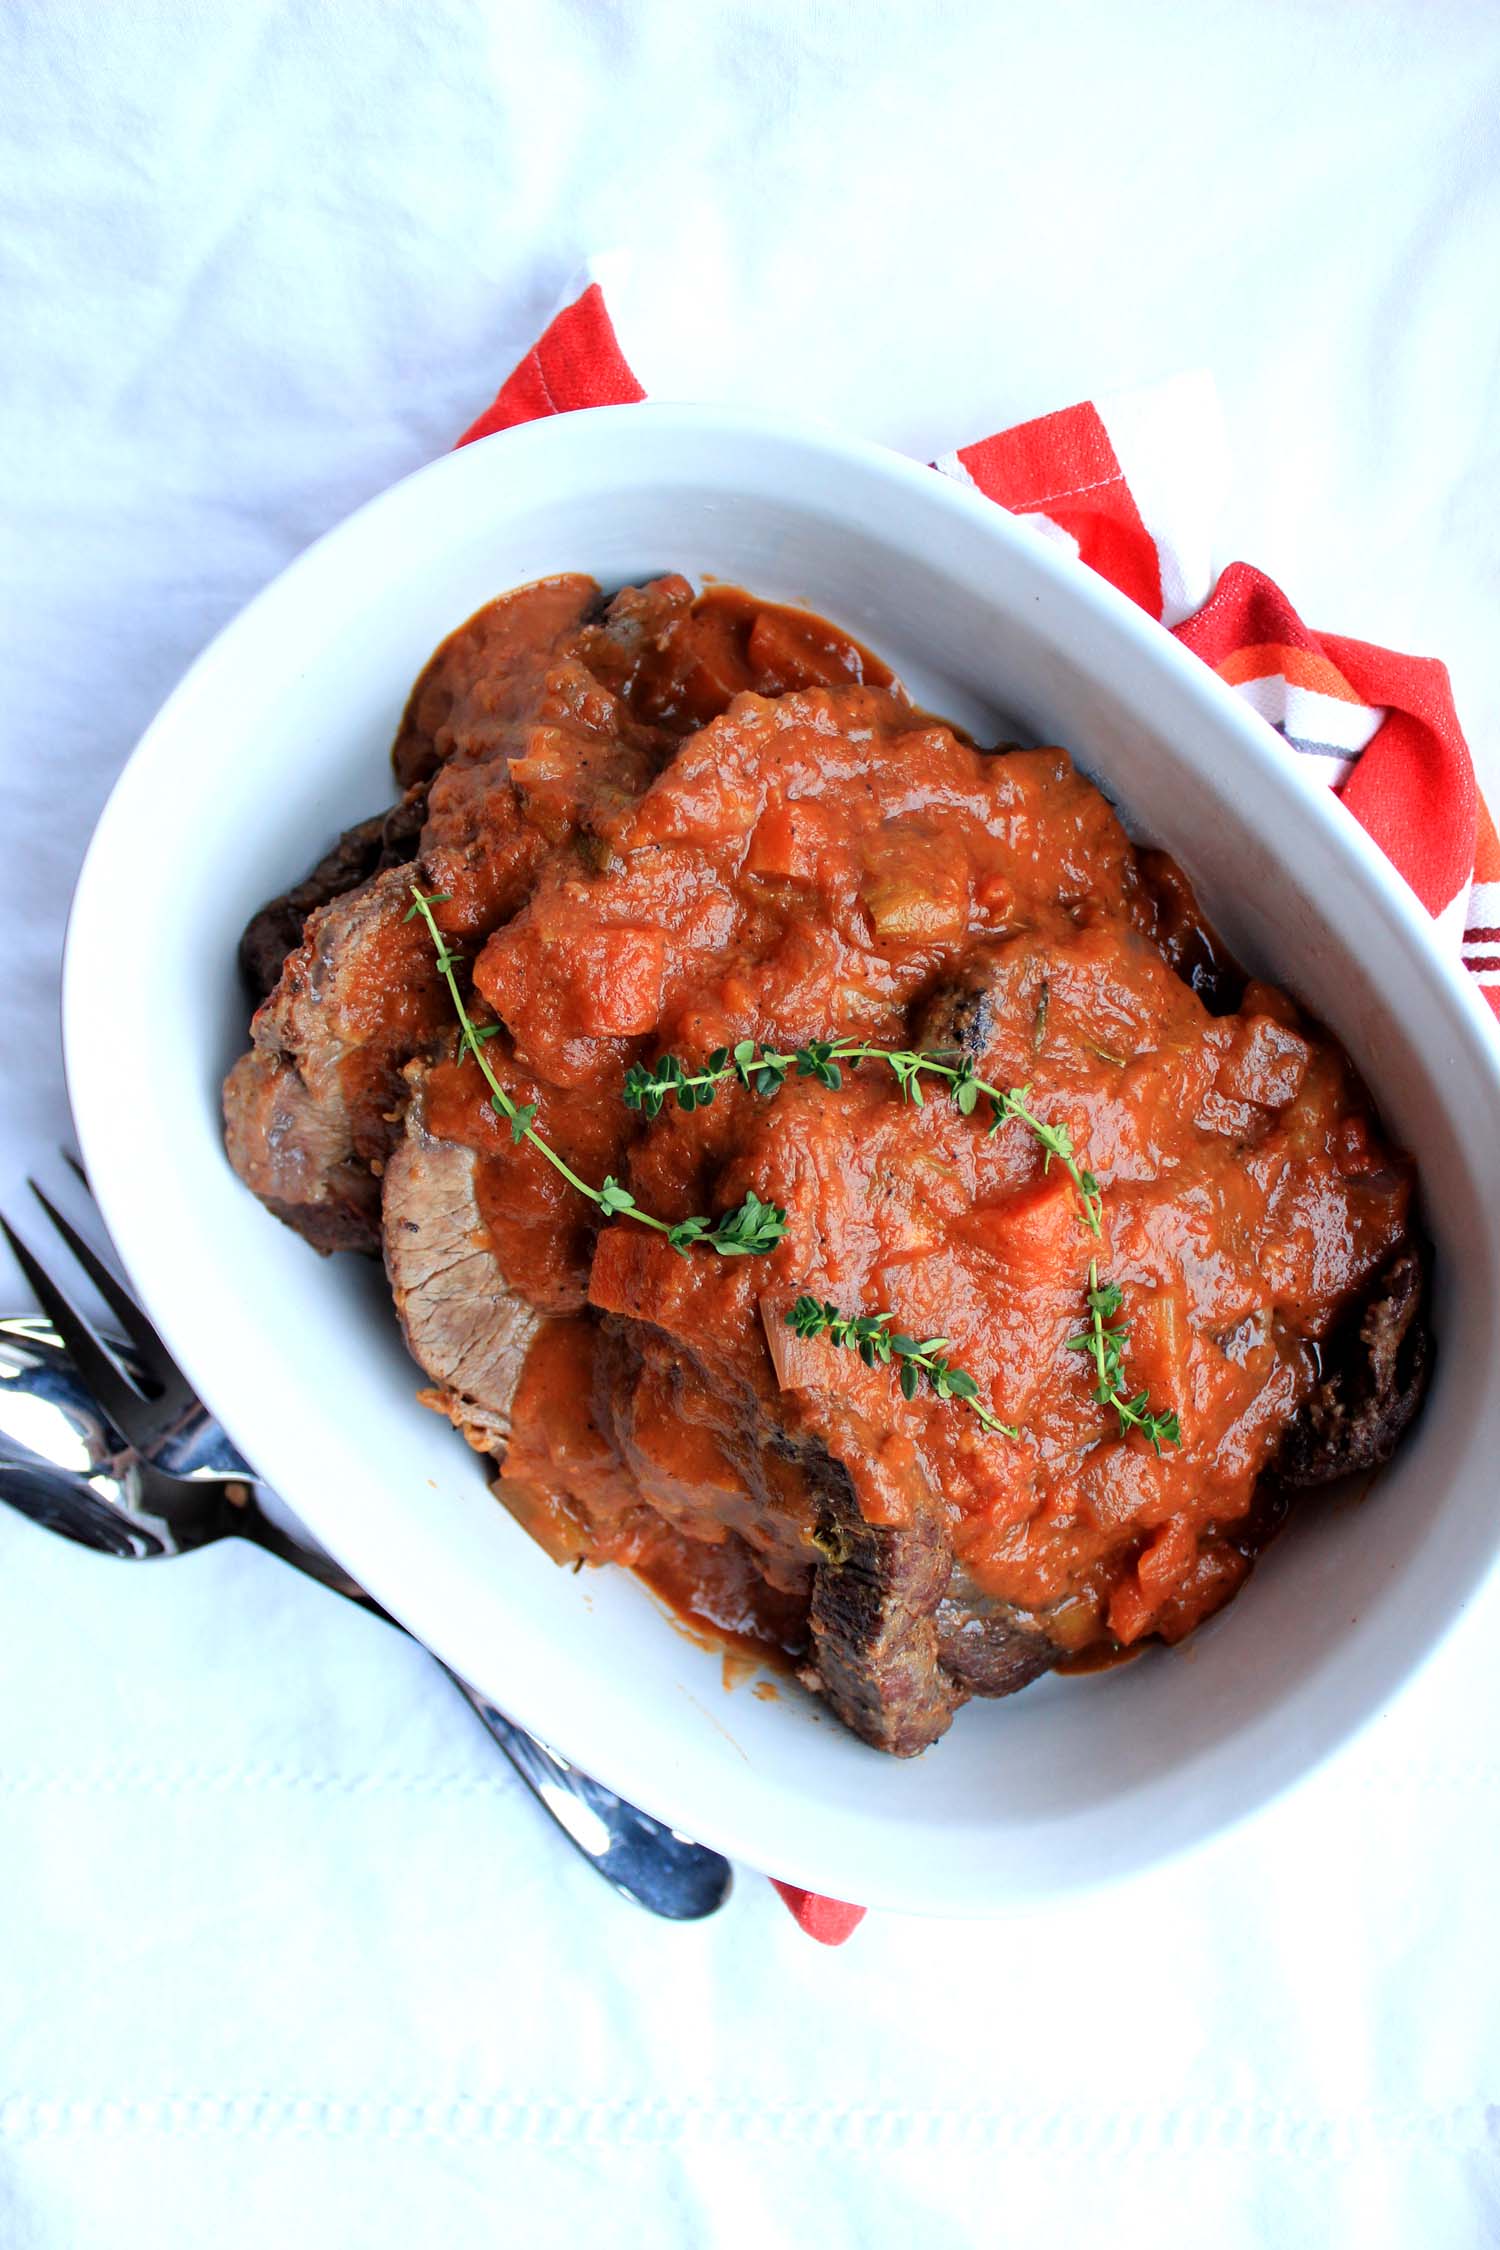
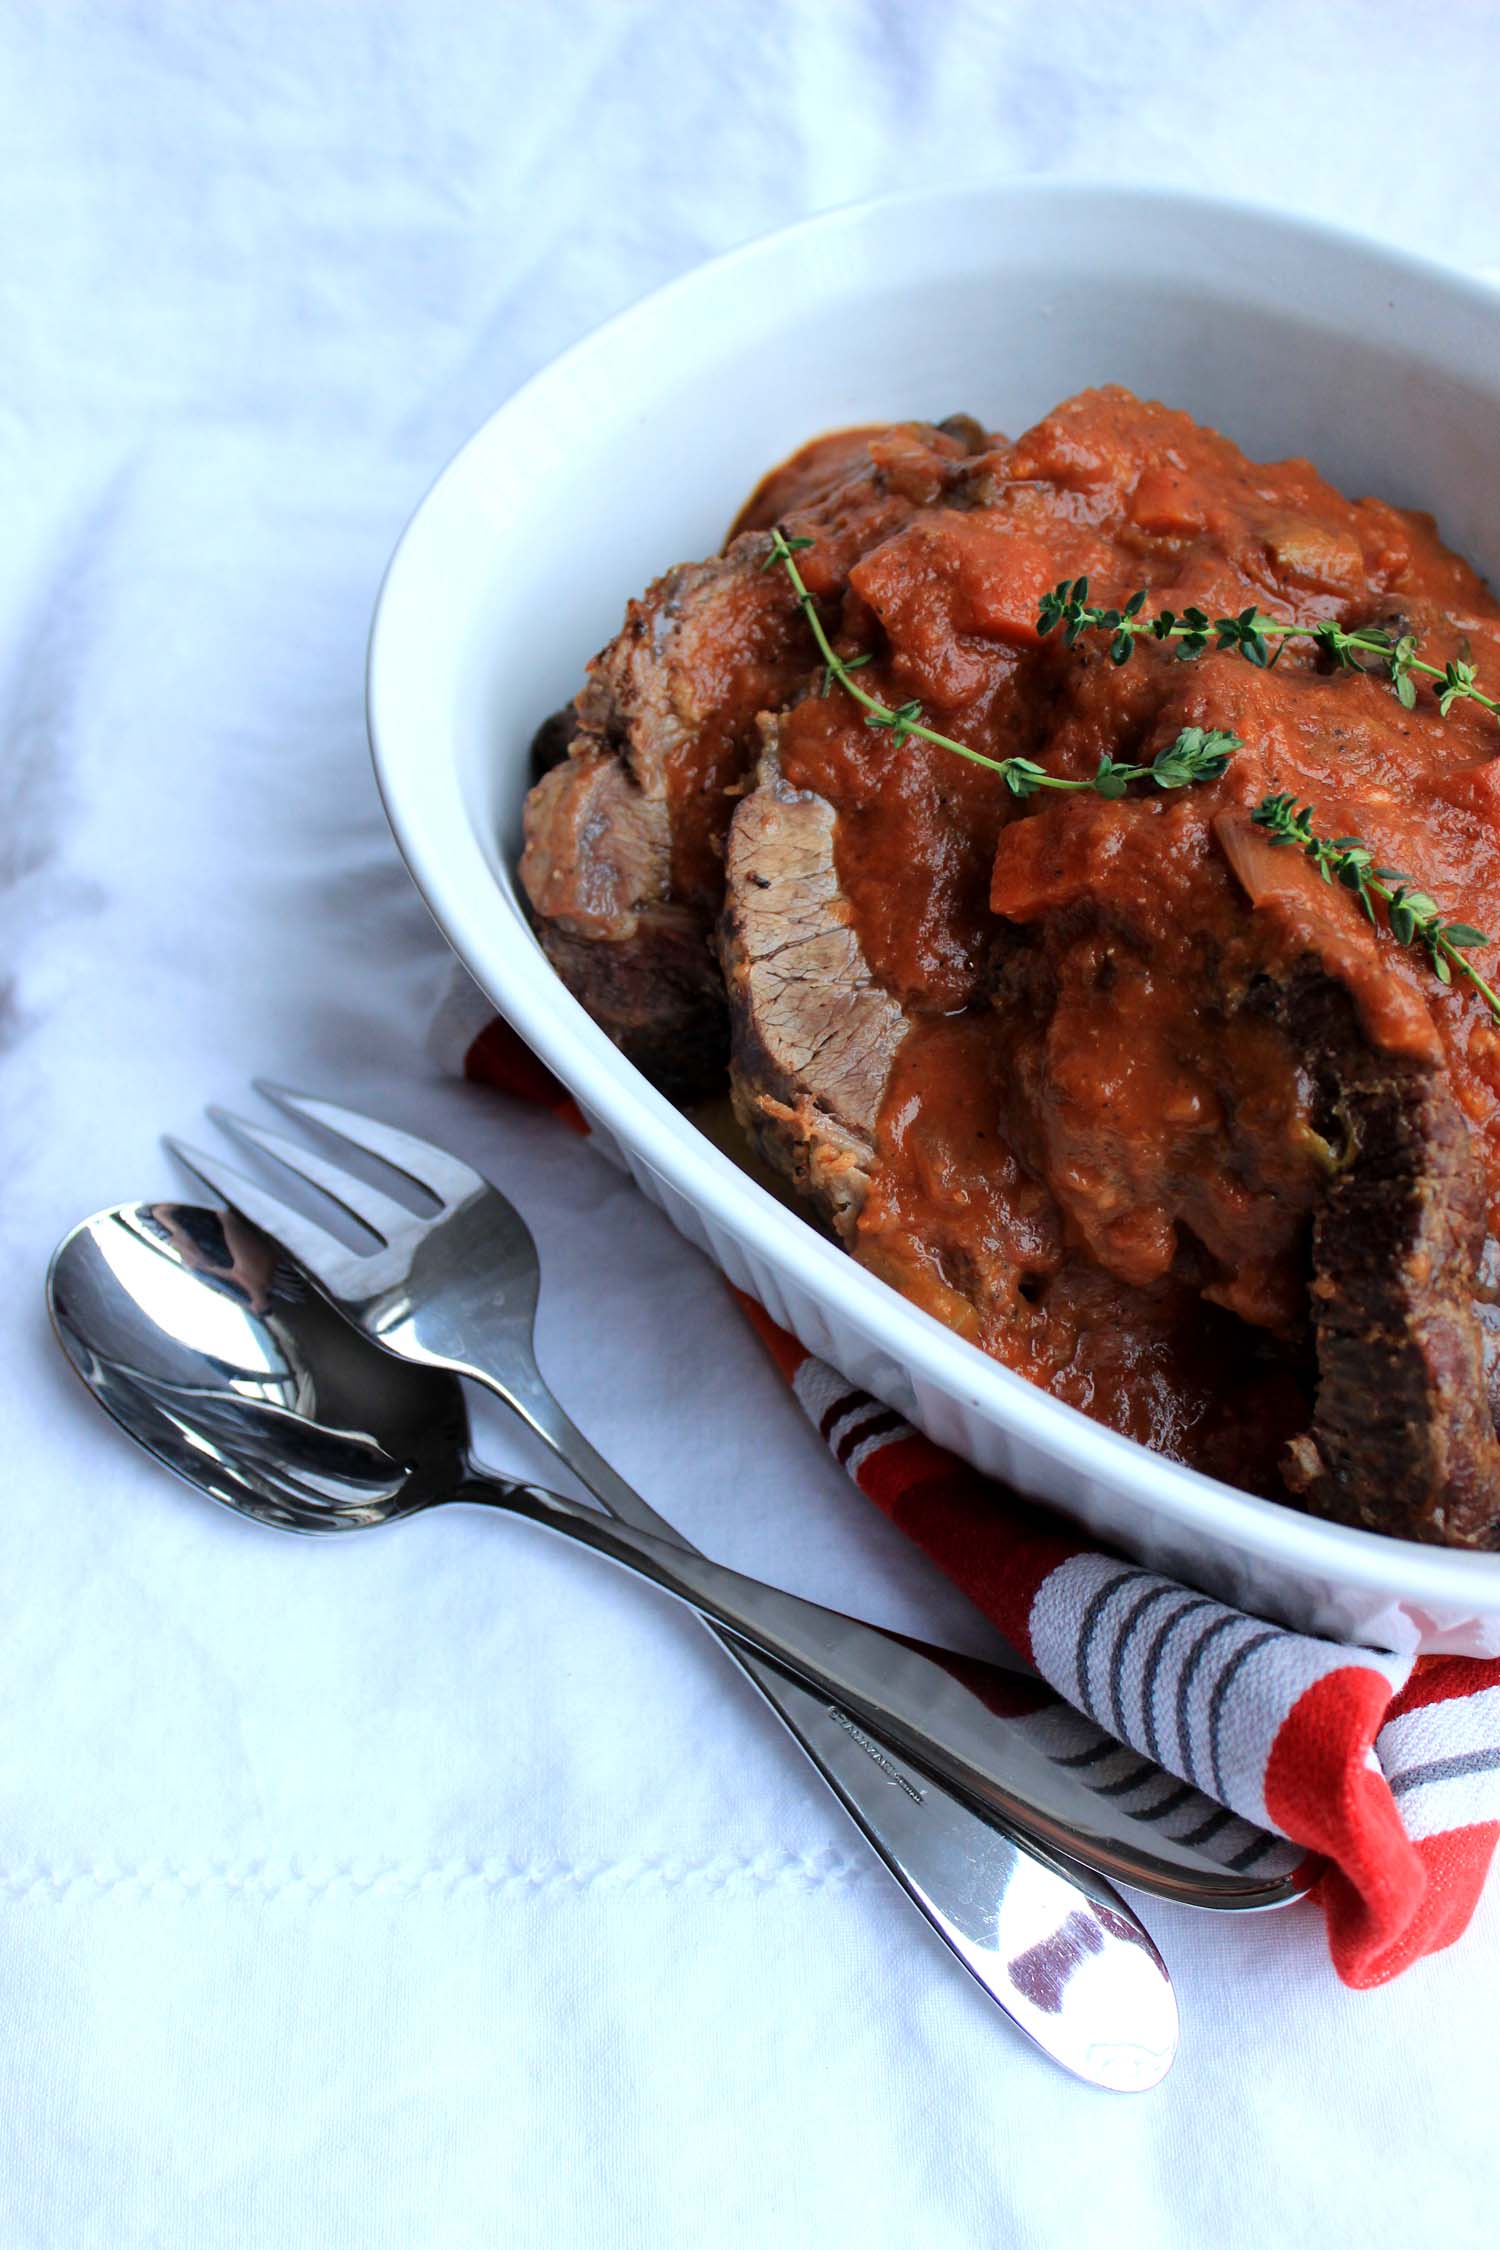
28:20 – I like how Ina upped the fanciness with the ingredients and the presentation by pre-slicing the roast. So much easier to serve!

29:38 – Dwyer arrives to pick up dinner and deliver her surprises to Ina, who seems genuinely delighted by them.

29:59 – Fast forward to dinner time and Dwyer sends Ina a photo of everyone enjoying their delicious meal. Yay!

Company Pot Roast | Image: Laura Messersmith

Company Pot Roast | Image: Laura Messersmith

Final Thoughts:
It’s amazing how the addition of an ingredient or one small change can transform one dish into something else entirely (ex. Beef Bourgignon vs. Company Pot Roast)

Still reflecting on the Pro Tip for the Ages. Should I stitch a throw pillow so I don’t forget?

Wondering, with all the cooking Ina does, how many people in the Hamptons get a catered dinner each week compliments of the Barefoot Contessa Test Kitchen?

Lessons Learned:
I’ve made similar dishes in the past, but I decided to make Company Pot Roast any way to learn more about Ina’s techniques for developing flavor and to see if it really was special enough for company.

Alliums – as I’ve been cooking more I’ve realized that using multiple members of this family - aka onions, leeks, garlic, shallots, etc. – can build layers and depth in a dish. The complexity of flavors increases so much just by using adding shallot or leeks to the standard onions. Try it sometime and see if you taste a difference too.

Sauce – similar to the layering of alliums, Ina’s recipes (and now my own) often incorporate wine and in this case, cognac too. I’m continually amazed by the richness a cup of red wine adds to a tomato sauce and the combination with roast beef is classic.

Presentation – the recipe suggests allowing the roast to rest before slicing and serving with the sauce. Such a small adjustment, but such a big difference! It saves the host(ess) from wrangling a giant piece of meat at the table and definitely takes this dish to “company” level.

Company Pot Roast | Image: Laura Messersmith

Company Pot Roast | Image: Laura Messersmith

Small Kitchen Friendly?
Surprisingly, yes - Company Pot Roast is essentially a one-pot meal! I used a large cutting board, my trusty 5 quart Le Creuset, and a blender. I also used a chef’s knife, measuring cups & spoons, tongs, a wooden spatula, a large spoon, and a large pronged fork. Kitchen twine will be helpful too.

The Verdict:
Who could doubt that the Barefoot Contessa has a kick-ass (pardon my French) and company appropriate recipe for pot roast? The flavor of the sauce is amazing - definitely serve this along side something to soak up the extra, like mashed potatoes or polenta - deeply tomato-y and rich with the wine and herbs. I’d also recommend saving any that remains after dinner to serve over pasta or with baked eggs (more on that idea next week!)

Company Pot Roast | Image: Laura Messersmith

Company Pot Roast | Image: Laura Messersmith

Butternut Squash & Gruyere Galette

Butternut Squash & Gruyere Galette | Image: Laura Messersmith

Butternut Squash & Gruyere Galette | Image: Laura Messersmith

The snow is still deep in Central Park, but winter seems to be easing its grip on the city; the banks along the street are beginning to recede leaving a trail of gritty treasure behind. Which means (if we’re lucky!) that spring is on its way and it’s time to get as many of the the cold weather recipes I’ve been thinking of out of my system – including this Butternut Squash & Gruyere Galette.

This recipe for a gratin written by Kimberley Hasselbrink was my introduction to the combination of butternut squash, Gruyere and toasted hazelnuts and quickly became a favorite. The rich nutty flavor of the cheese emphasized by the hazelnuts and paired with the deep roasted flavor of the caramelized onions and butternut squash is amazing.

I’ve been focused on improving my pie crust game in 2015 and combining this filling with a whole wheat crust seemed like a match made in heaven. I love the toasty flavor of the whole wheat, and the rustic appearance of a galette (or crostata if you prefer) fits beautifully with this earthy, but elegant dish.

Butternut Squash & Gruyere Galette | Image: Laura Messersmith

Butternut Squash & Gruyere Galette | Image: Laura Messersmith

Butternut Squash & Gruyere Galette (serves: 4-6 people)

Pastry Ingredients:
1 cup whole wheat flour
6 tablespoons cold, unsalted butter
3/4 teaspoon kosher salt
1/3 cup very cold water

Filling Ingredients:
2 pounds butternut squash
1 cup (1 medium) yellow onion
1/4 cup whole hazelnuts (or 1/8 cup chopped)
1/4 pound Gruyere, grated
1 egg, beaten
2 tablespoons unsalted butter
2 tablespoons olive oil
3 teaspoons apple cider vinegar
1 1/2 teaspoons fresh thyme
1 1/2 teaspoons kosher salt
3/4 teaspoon black pepper

Pastry Instructions:
Dice the cold unsalted butter into small cubes and measure the water. Replace both in the refrigerator while you set up and measure the remaining ingredients. In the bowl of a food processor fitted with a steel blade place the whole wheat flour and kosher salt. Pulse a few times to mix.

Add the diced, cold butter to the food processor and toss gently in the flour to coat. Watch your fingers! Replace the cover and pulse about 10-15 times until the butter is the size of peas and evenly distributed in the flour.

Lastly, slowly pour the ice water through the feed tube of the processor while pulsing the blade. As soon as the dough begins to pull together into a crumbly ball, stop pulsing the processor. Turn the pieces of dough out onto a piece of plastic wrap and use the wrap to press into a single flat disc. Refrigerate the dough for at least an hour until it becomes firm.

Filling Instructions:
Pre heat the oven to 325 degrees F.

While the dough chills, peel the butternut squash and cut in half lengthwise. Scoop out the seeds and discard (or keep if you want to toast them!) Slice both halves into semi-circles about 1/3 inch wide.

Place the butternut squash pieces on a baking sheet lined with parchment paper and toss with the olive oil, apple cider vinegar, kosher salt and black pepper. Make sure the pieces are evenly coated and have space on the baking sheet. Bake for 20 minutes at 325 degrees F turning the pieces over halfway through.

Peel and slice the onions into thin rings or half-moons. Melt 2 tablespoons of butter in a medium sauté pan over very low heat and cook the onions for 20-25 minutes until they soften and caramelize, stirring occasionally.

Toast the whole hazelnuts for 3-5 minutes in a small dry sauté pan. Keep a close watch on the nuts; shimmy the pan periodically to turn and prevent them from burning. Allow to cool and then very roughly chop to your taste. Grate or chop the gruyere.

Turn the oven up to 400 degrees F.

To assemble, roll the chilled dough out on a lightly floured surface to about 1/4 inch thick and 7-8 inches in diameter. Place the dough on a parchment paper lined baking sheet and layer the gruyere, roasted butternut squash, caramelized onions, toasted hazelnuts in the middle leaving a 1 – 1 ½ inch border. Sprinkle the layers with the fresh thyme leaves.

Fold a section of the dough border up to partially cover the filling and overlapping the extra to form pleats. Press the folds gently together and brush with the beaten egg.

Bake at 400 degrees F for 30-40 minutes, rotating the baking sheet halfway through the cooking time, until the crust is golden and the butternut squash is tender.

Allow to cool for a few minutes before serving.

Inspired by and partially adapted from Butternut Squash Gratin by Kimberley Hasselbrink for Etsy.

Butternut Squash & Gruyere Galette | Image: Laura Messersmith

Butternut Squash & Gruyere Galette | Image: Laura Messersmith

Small Kitchen Friendly?
Yes, with a little organization. For the pastry I used a 6 cup food processor (a large bowl and a pastry cutter, or even two butter knives will work too), a rolling pin, and measuring cups and spoons. For the filling and to finish the galette I used a large cutting board, chef’s knife, medium sauté pan, two baking sheets, a vegetable peeler, and wooden spatula. Parchment paper is also super helpful with clean up, or if you want to re-use a baking sheet.

The Verdict:
I’d like to pretend that I sat down very genteelly and had a piece of Butternut Squash & Gruyere Galette with a beautiful salad and a glass of sauvignon blanc like a grown-up. But really midway through taking the photos for this post I couldn’t resist the warm toasty whole wheat pastry wrapped around the mellow squash and caramelized onions. So, there I was standing over the table with a wedge of galette in one hand and the camera in the other. If you were here when it came out of the oven you wouldn’t blame me – I hope! This reheats in the oven nicely, so if there happen to be leftovers you’ll still be able to enjoy them the next day.

Butternut Squash & Gruyere Galette | Image: Laura Messersmith

Butternut Squash & Gruyere Galette | Image: Laura Messersmith

Apple Cake Tatin

Apple Cake Tatin | Image: Laura Messersmith

Apple Cake Tatin | Image: Laura Messersmith

Each week I follow along with Ina Garten (aka the Barefoot Contessa) and attempt to recreate one of her dishes in my tiny New York City kitchen. The catch? This is my version of cooking school and I’m making these recipes for the first time. I’ll share both my successes and um, challenges, along the way and we’ll see if I can keep up with the Contessa!

Episode: “Housewarming Party”

The Set-up: Ina’s friend Valerie moved into the neighborhood, so Ina is bringing her an entire dinner to celebrate the new house.

The Menu: Cheese Puffs, Herbed New Potatoes, Loin of Pork with Green Peppercorns, Roasted Asparagus, Apple Cake “Tatin”

0:29 – Before we even start with the cooking can I be the first to say: this is major dinner – five (!) recipes all for a housewarming party? Whoa.

1:10 – Now that I have that out of my system we can get on with the Loin of Pork with Green Peppercorns.

2:34 – In keeping with our theme of making a Major Dinner, Ina is using a bone-in pork rib roast, frenched and all. Not sure that my local grocery store stocks such a thing….

3:27 – Now for the rub/marinade which involves whole grain and Dijon mustard along with freshly ground fennel seed. Yum!

4:15 – The appetizer for this Major Dinner are Cheese Puffs - involves pâte au choux, the type of pastry dough that is used for éclairs, beignets, and profiteroles.

5:44 – I loooove all the delicate little pastries I mentioned above, so trust that I am watching this process like a hawk.

6:06 – After making croissants I (unfairly) assumed that pâte au choux would also involve 5,000 steps, but it actually doesn’t seem that hard! I’m starting to dream of beignets…

7:32 – Dang. I knew there had to be a catch: piping bag and accompanying skills required!

10:45 – Now for dessert: Apple Cake “Tatin” which involves making caramel – yikes!

11:20 – I notice that Ina cut the apple slices in really thick wedges – I assume that pouring hot caramel over them does a lot of the cooking?

12:53 – Cakes that incorporate sour cream (or in my case, greek yogurt) are the best – so moist!

13:29 – Valerie has arrived to collect the Cheese Puffs and get instructions on re-heating. She seems to live directly next door to Ina – guess who I’d borrow a cup of sugar from…

14:21 – The Herbed New Potatoes go into a dutch oven to cook themselves with just a little butter – this is a technique I need to try.

19:14 – Time to turn the Apple Cake Tatin out of its pan and I swear this is one of the most stressful things about baking. Bundt cakes half stuck in the pan is my nightmare.

19:22 – Spoiler alert: Ina’s comes out just fine. We also check-in with Valerie talking to herself about the good fortune of having Ina next-door, but do I detect a dash of haterade in her words?

20:47 – Our main course - Loin of Pork with Green Peppercorns – is out of the oven and on cue registers exactly 140 degrees. Good job, pork.

21:03 – Now to make the sauce with the green peppercorns. A little research tells me that they are unripe version of what becomes black peppercorns preserved in a brine.

22:35 – Ina is putting the final touches on dinner – prepping the Roasted Asparagus and adding herbs to the Herbed New Potatoes.

23:18 – Back over to Valerie and the Cheese Puffs and she’s using her best scheming villain voice, and plotting how many she can eat before the guests arrive. “Divine, just diviiiine” like they’re stolen jewels. Not that I can relate or anything.

24:46 – Ina’s friend Frank arrives to cart dutch ovens around. I never noticed how tall he is before, but next to Ina he looks like a giant.

28:24 – Valerie is put in charge of passing the cheese puffs around while Ina plates dinner and we know she’s not to be trusted! An unusual misstep for Ina.

29:50 – Everyone sits down to eat and as Ina reveals the Apple Cake “Tatin” for dessert. Valerie gets to keep the leftovers, so I’m guessing those will be some small slices passed around…

Apple Cake Tatin | Image: Laura Messersmith

Apple Cake Tatin | Image: Laura Messersmith

Final Thoughts:
I’m seriously tempted to try making choux pastry. Am I crazy?

Starting to feel like my lack of piping skills needs to be addressed. This is getting ridiculous.

I gave poor Valerie a hard time for coveting those cheese puffs, but who hasn’t been tempted to eat half of something before guests even arrive and pretend that's all you made?

Lessons Learned:

I pretty much can’t believe that I’ve never attempted anything like an Apple Tart Tatin or in this case Apple Cake “Tatin”. This oversight can probably be blamed on the “caramel-factor” which loosely translates to my fear of anything that requires molten sugar and/or a candy thermometer.

Caramel – This was nerve-racking, but ultimately not too hard. If you’re nervous like I was use a big pot – it’s less intimidating some how. DON’T stir, just veeery gently swirl the water and sugar together. Lastly, this takes longer than you might think – about 5 minutes by my count. Once the caramel begins change from semi-opaque white to light gold keep a close watch – you’re shooting for something the color of honey.

Apple Placement – This probably sounds silly, but it took me a few tries to figure out how to fit the right number of apple slices in my pie dish, so I’d wait on buttering until you have a plan of attack. In my 9” pie plate 9 thick slices scalloped around the perimeter with the remaining 3 slices in the middle was just right.

Butter – A note on butter. The recipe says “generously” and I can’t emphasize enough: don’t skimp! I found that smearing a healthy 1 – 1 1/2 tablespoons with the empty butter wrapper was just about right. The cake, apples, and the accompanying caramel were released from the pie plate without too much trouble.

Releasing the Cake – Again, the recipe calls for the baked cake to cool for 15 minutes before turning it out onto a plate. I used the cover and flip technique and then let gravity do the rest. Here’s the thing: don’t wait too much past that 15 minute mark or the caramel will cool too much and you’ll be chipping it from the bottom.

Apple Cake Tatin | Image: Laura Messersmith

Apple Cake Tatin | Image: Laura Messersmith

Small Kitchen Friendly?
Kinda. I used a medium sauce pan, medium and small mixing bowls, hand-held electric mixer, and 9 inch pie plate. I also used a rubber spatula, medium cutting board, chef’s knife, peeler, microplane grater, measuring cups and spoons.

The Verdict:
I made Apple Cake “Tatin” as dessert for a dinner party with friends and it seemed to be a hit, or at least they were too polite to say otherwise! Personally, I loooved it – the apples and caramel are the star, but the cake itself is really delicious too. It kind of reminds me of angelfood cake – totally different textures of course - there’s just enough lemon zest and vanilla to make it flavorful on it’s own, but still let the fruit shine. I will be making this again, for sure.

Apple Cake Tatin | Image: Laura Messersmith

Apple Cake Tatin | Image: Laura Messersmith

Chicken a la Vendemmia

Chicken a la Vendemmia | Image: Laura Messersmith

Chicken a la Vendemmia | Image: Laura Messersmith

Each week I follow along with Ina Garten (aka the Barefoot Contessa) and attempt to recreate one of her dishes in my tiny New York City kitchen. The catch? This is my version of cooking school and I’m making these recipes for the first time. I’ll share both my successes and um, challenges, along the way and we’ll see if I can keep up with the Contessa!

Episode: “Dinner in Napa”

The Set-up: The Gartens are on vacation in Napa (lucky!), so Ina is cooking California-style.

The Menu: Israeli Couscous and Tuna Salad, Chicken a la Vendemmia, Raspberry Crumble Bars

0:35 – The Gartens have rented a house in Napa for their vacation and Ina is making them dinner in the garden.

1:16 – Starting in order of importance, Ina is making dessert first: Raspberry Crumble Bars, which apparently were a Barefoot Contessa staple.

2:03 – So far this looks like a really simple recipe – flour, sugar, butter, salt, vanilla.

3:22 – Now raspberry jam is spread over a short bread crust, and this actually reminds me a lot of a recipe I make a lot, but mine involves chocolate chips…

4:37 – Interesting, Ina is using granola to make a short-cut crumble topping. Very tricky…

5:29 – Field trip! We’re going with Ina to visit the Oakville Grocery one of my favorite places in the Napa Valley!

6:14 – It turns out that Oakville Grocery served as a guide back when Ina was first running Barefoot Contessa in the late 70s. Further confirmation that she has great taste.

9:33 - We’re back at the Garten’s home away from home to make Israeli Couscous and Tuna Salad which I’m guessing was inspired by Oakville Grocery’s “main course salads.”

10:02 – The recipe calls for Italian tuna packed in olive oil and I’ve really never worked with that ingredient. Ina says it has lots of flavor, so…?

11:21 – I was on board with everything until the black olives – no thanks, too briny!

12:13 – Ina says that lots of people think couscous is a grain, but that it’s actually a pasta. Cue the More You Know Star…

13:38 – Now we’re checking in with some California chefs to get advice on great salads: Craig Stoll @ Delfina says he keeps it simple and uses the best ingredients like caprese salad with heirloom tomatoes and basil oil.

13:55 - Liz Prueitt @ Tartine contrasts hot and cold, so she serves wilted spinach and gruyere with vinaigrette tossed baby greens.

14:24 – Danny Bowien @ Mission Chinese plays with plating by wrapping a spicy salad with lots of fresh herbs in toasted nori sheets like a sushi handroll. Sort of like a cross between a salad and a spring roll…

15:17 – Back to Ina’s to finish off the Israeli Couscous and Tuna Salad with fresh herbs and a little lemon juice.

19:59 - Time for dinner with Jeffrey is the glorious garden at complete with chilled glasses of rosé. This looks like heaven.

21:30 – Chef Michael Chiarello has invited Ina to come to his home, which just happens to be surrounded by vineyards. Good lord, I had forgotten how gorgeous Napa is.

22:16 – I suppose one of the benefits of being a famous chef living in an agricultural paradise is wandering around your property snipping bunches of grapes, sprigs of rosemary and ripe figs just before it’s time to cook!

23:42 – We’re in the kitchen now getting ready to make Chicken a la Vendemmia, a Southern Italian dish traditionally made during harvest time.

24:25 – Pro Tip: Cook the “presentation side” first while the oil in the pan is fresh and it will cook cleaner.

25:37 – Now I know that Chef Chiarello and I are kindred spirits: he likes cobalt blue Le Crueset pans too!

28:44 – Finishing touches to the chicken as Michael and Ina make a sauce from the chicken drippings grape juice and figs.

29:39 – Dinner time! The chicken looks delicious and according to Ina the flavor is like a sweet and savory taste of fall. Yum!

Final Thoughts:
I love incorporating fruit into savory dishes, so I’m excited to try it with grapes.

The California style of cooking is so distinctively flavorful and simple, definitely bears further investigation….

It’s official: I am dying to get back to Napa!

Chicken a la Vendemmia | Image: Laura Messersmith

Chicken a la Vendemmia | Image: Laura Messersmith

Lessons Learned:
I wanted to try Chicken a la Vendemmia for a few reason – first: we really liked the flavor of the grapes in the Roasted Sausages and Grapes and second, some of the ingredients reminded me a lot of these Pickled Grapes from the Lee Brothers. All good news as far as I was concerned.

Sautéing the Chicken – This is a technique I’ve been practicing now for the past year and I’m just now starting to feel confident in my ability to get really crispy flavorful skin while maintaining juicy tender meat. A lot of credit goes to pan temperature – getting the pan and then later the olive oil really quite hot is key. Remember that shimmer I mentioned? That comes into play here too.

Reducing the Sauce – Definitely “toast” the rosemary a little before adding the grape juice to help mellow the flavor of the herb and infuse the sauce. After that, reducing the fresh grape juice just takes a little patience and a little stirring, but the resulting concentration of sweet and tart sauce is worth it.

Herbs – Rosemary is pretty straightforward, but fennel spice was a little beyond what we had on hand and frankly I forgot to see if the grocery store here carries it. No matter though, I find that tarragon and fennel have a similar “green” anise flavor, so I made a one-to-one substitution with dried tarragon and the outcome was still delicious.

Chicken a la Vendemmia | Image: Laura Messersmith

Chicken a la Vendemmia | Image: Laura Messersmith

Small Kitchen Friendly?
Yes, assuming you have a blender or food processor. I used a blender, a small mesh sieve, medium cutting board, chef’s knife, and a medium sauté pan. I also needed tongs, a rubber spatula, and measuring cups and spoons.

The Verdict:
I made Chicken a la Vendemmia for Mike and I earlier this week and Mike, as you might have suspected, will always ask for more spice. If that’s you too, I’d suggest taking the red pepper flake inspiration from the Lee Brother’s pickle recipe and incorporating it at the same time you add the rosemary to the sauté pan. I also added a handful of fresh whole grapes in the last few minutes for some textural interest. This recipe has a lot to recommend it – simple ingredients, big concentrated flavors, and processes that make even the saddest wintertime grape sing.

Chicken a la Vendemmia | Image: Laura Messersmith

Chicken a la Vendemmia | Image: Laura Messersmith