Chicken a la Vendemmia

Chicken a la Vendemmia | Image: Laura Messersmith

Chicken a la Vendemmia | Image: Laura Messersmith

Each week I follow along with Ina Garten (aka the Barefoot Contessa) and attempt to recreate one of her dishes in my tiny New York City kitchen. The catch? This is my version of cooking school and I’m making these recipes for the first time. I’ll share both my successes and um, challenges, along the way and we’ll see if I can keep up with the Contessa!

Episode: “Dinner in Napa”

The Set-up: The Gartens are on vacation in Napa (lucky!), so Ina is cooking California-style.

The Menu: Israeli Couscous and Tuna Salad, Chicken a la Vendemmia, Raspberry Crumble Bars

0:35 – The Gartens have rented a house in Napa for their vacation and Ina is making them dinner in the garden.

1:16 – Starting in order of importance, Ina is making dessert first: Raspberry Crumble Bars, which apparently were a Barefoot Contessa staple.

2:03 – So far this looks like a really simple recipe – flour, sugar, butter, salt, vanilla.

3:22 – Now raspberry jam is spread over a short bread crust, and this actually reminds me a lot of a recipe I make a lot, but mine involves chocolate chips…

4:37 – Interesting, Ina is using granola to make a short-cut crumble topping. Very tricky…

5:29 – Field trip! We’re going with Ina to visit the Oakville Grocery one of my favorite places in the Napa Valley!

6:14 – It turns out that Oakville Grocery served as a guide back when Ina was first running Barefoot Contessa in the late 70s. Further confirmation that she has great taste.

9:33 - We’re back at the Garten’s home away from home to make Israeli Couscous and Tuna Salad which I’m guessing was inspired by Oakville Grocery’s “main course salads.”

10:02 – The recipe calls for Italian tuna packed in olive oil and I’ve really never worked with that ingredient. Ina says it has lots of flavor, so…?

11:21 – I was on board with everything until the black olives – no thanks, too briny!

12:13 – Ina says that lots of people think couscous is a grain, but that it’s actually a pasta. Cue the More You Know Star…

13:38 – Now we’re checking in with some California chefs to get advice on great salads: Craig Stoll @ Delfina says he keeps it simple and uses the best ingredients like caprese salad with heirloom tomatoes and basil oil.

13:55 - Liz Prueitt @ Tartine contrasts hot and cold, so she serves wilted spinach and gruyere with vinaigrette tossed baby greens.

14:24 – Danny Bowien @ Mission Chinese plays with plating by wrapping a spicy salad with lots of fresh herbs in toasted nori sheets like a sushi handroll. Sort of like a cross between a salad and a spring roll…

15:17 – Back to Ina’s to finish off the Israeli Couscous and Tuna Salad with fresh herbs and a little lemon juice.

19:59 - Time for dinner with Jeffrey is the glorious garden at complete with chilled glasses of rosé. This looks like heaven.

21:30 – Chef Michael Chiarello has invited Ina to come to his home, which just happens to be surrounded by vineyards. Good lord, I had forgotten how gorgeous Napa is.

22:16 – I suppose one of the benefits of being a famous chef living in an agricultural paradise is wandering around your property snipping bunches of grapes, sprigs of rosemary and ripe figs just before it’s time to cook!

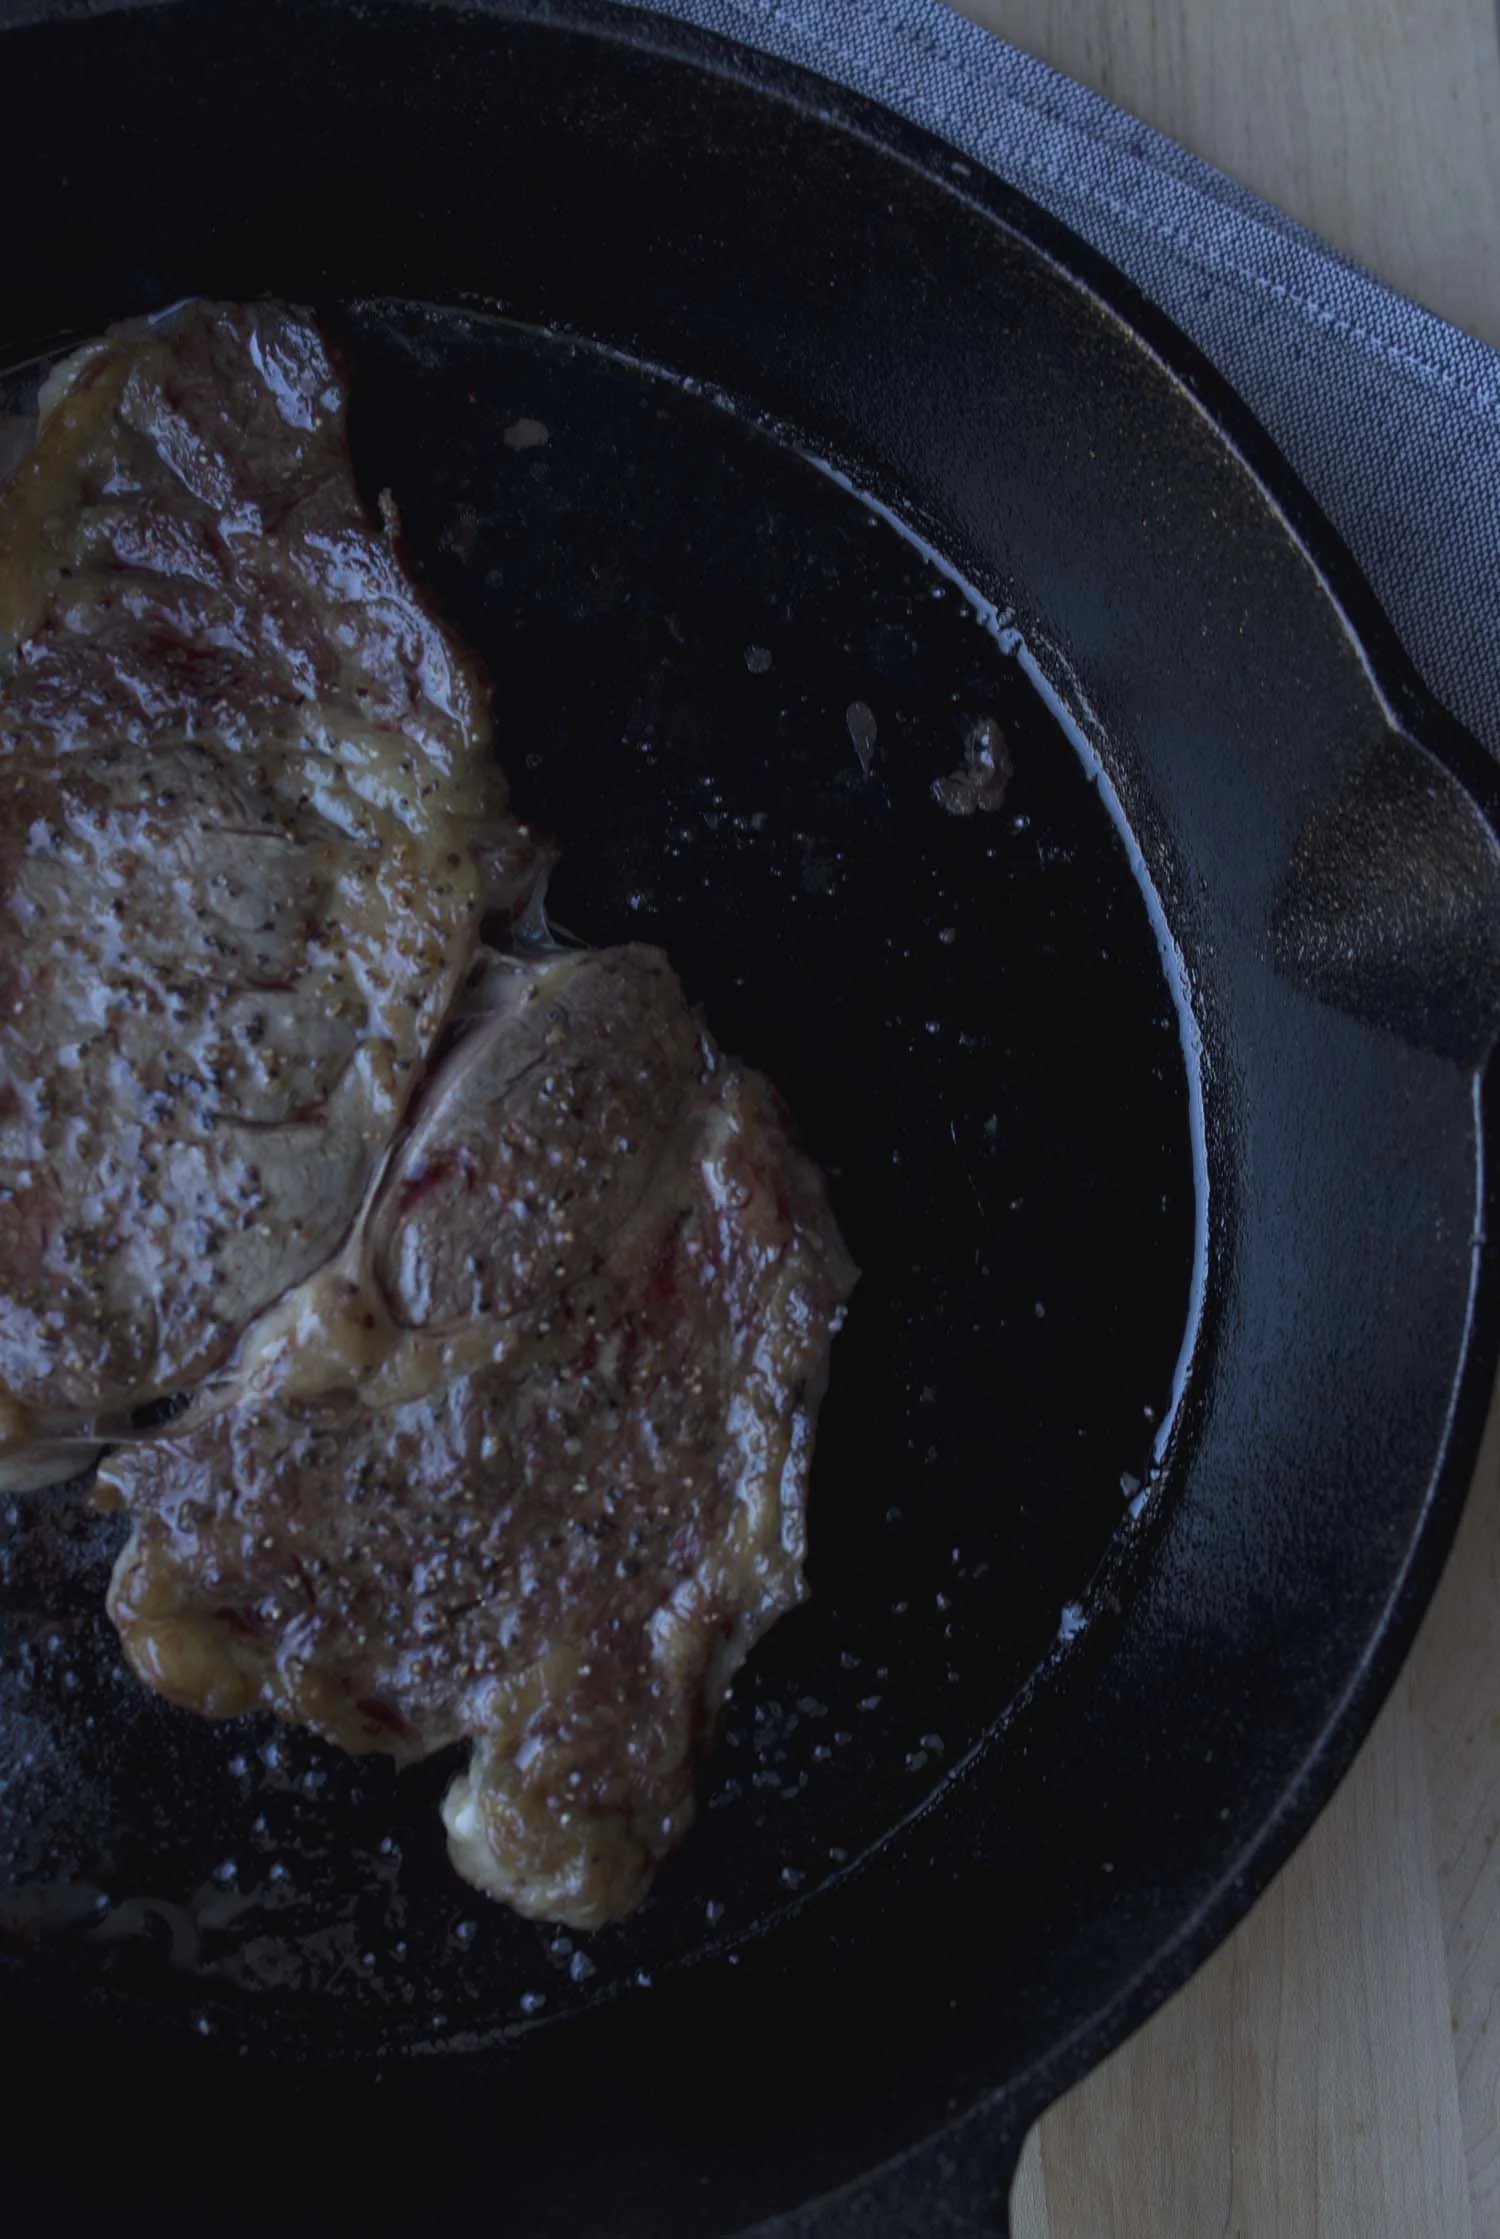
23:42 – We’re in the kitchen now getting ready to make Chicken a la Vendemmia, a Southern Italian dish traditionally made during harvest time.

24:25 – Pro Tip: Cook the “presentation side” first while the oil in the pan is fresh and it will cook cleaner.

25:37 – Now I know that Chef Chiarello and I are kindred spirits: he likes cobalt blue Le Crueset pans too!

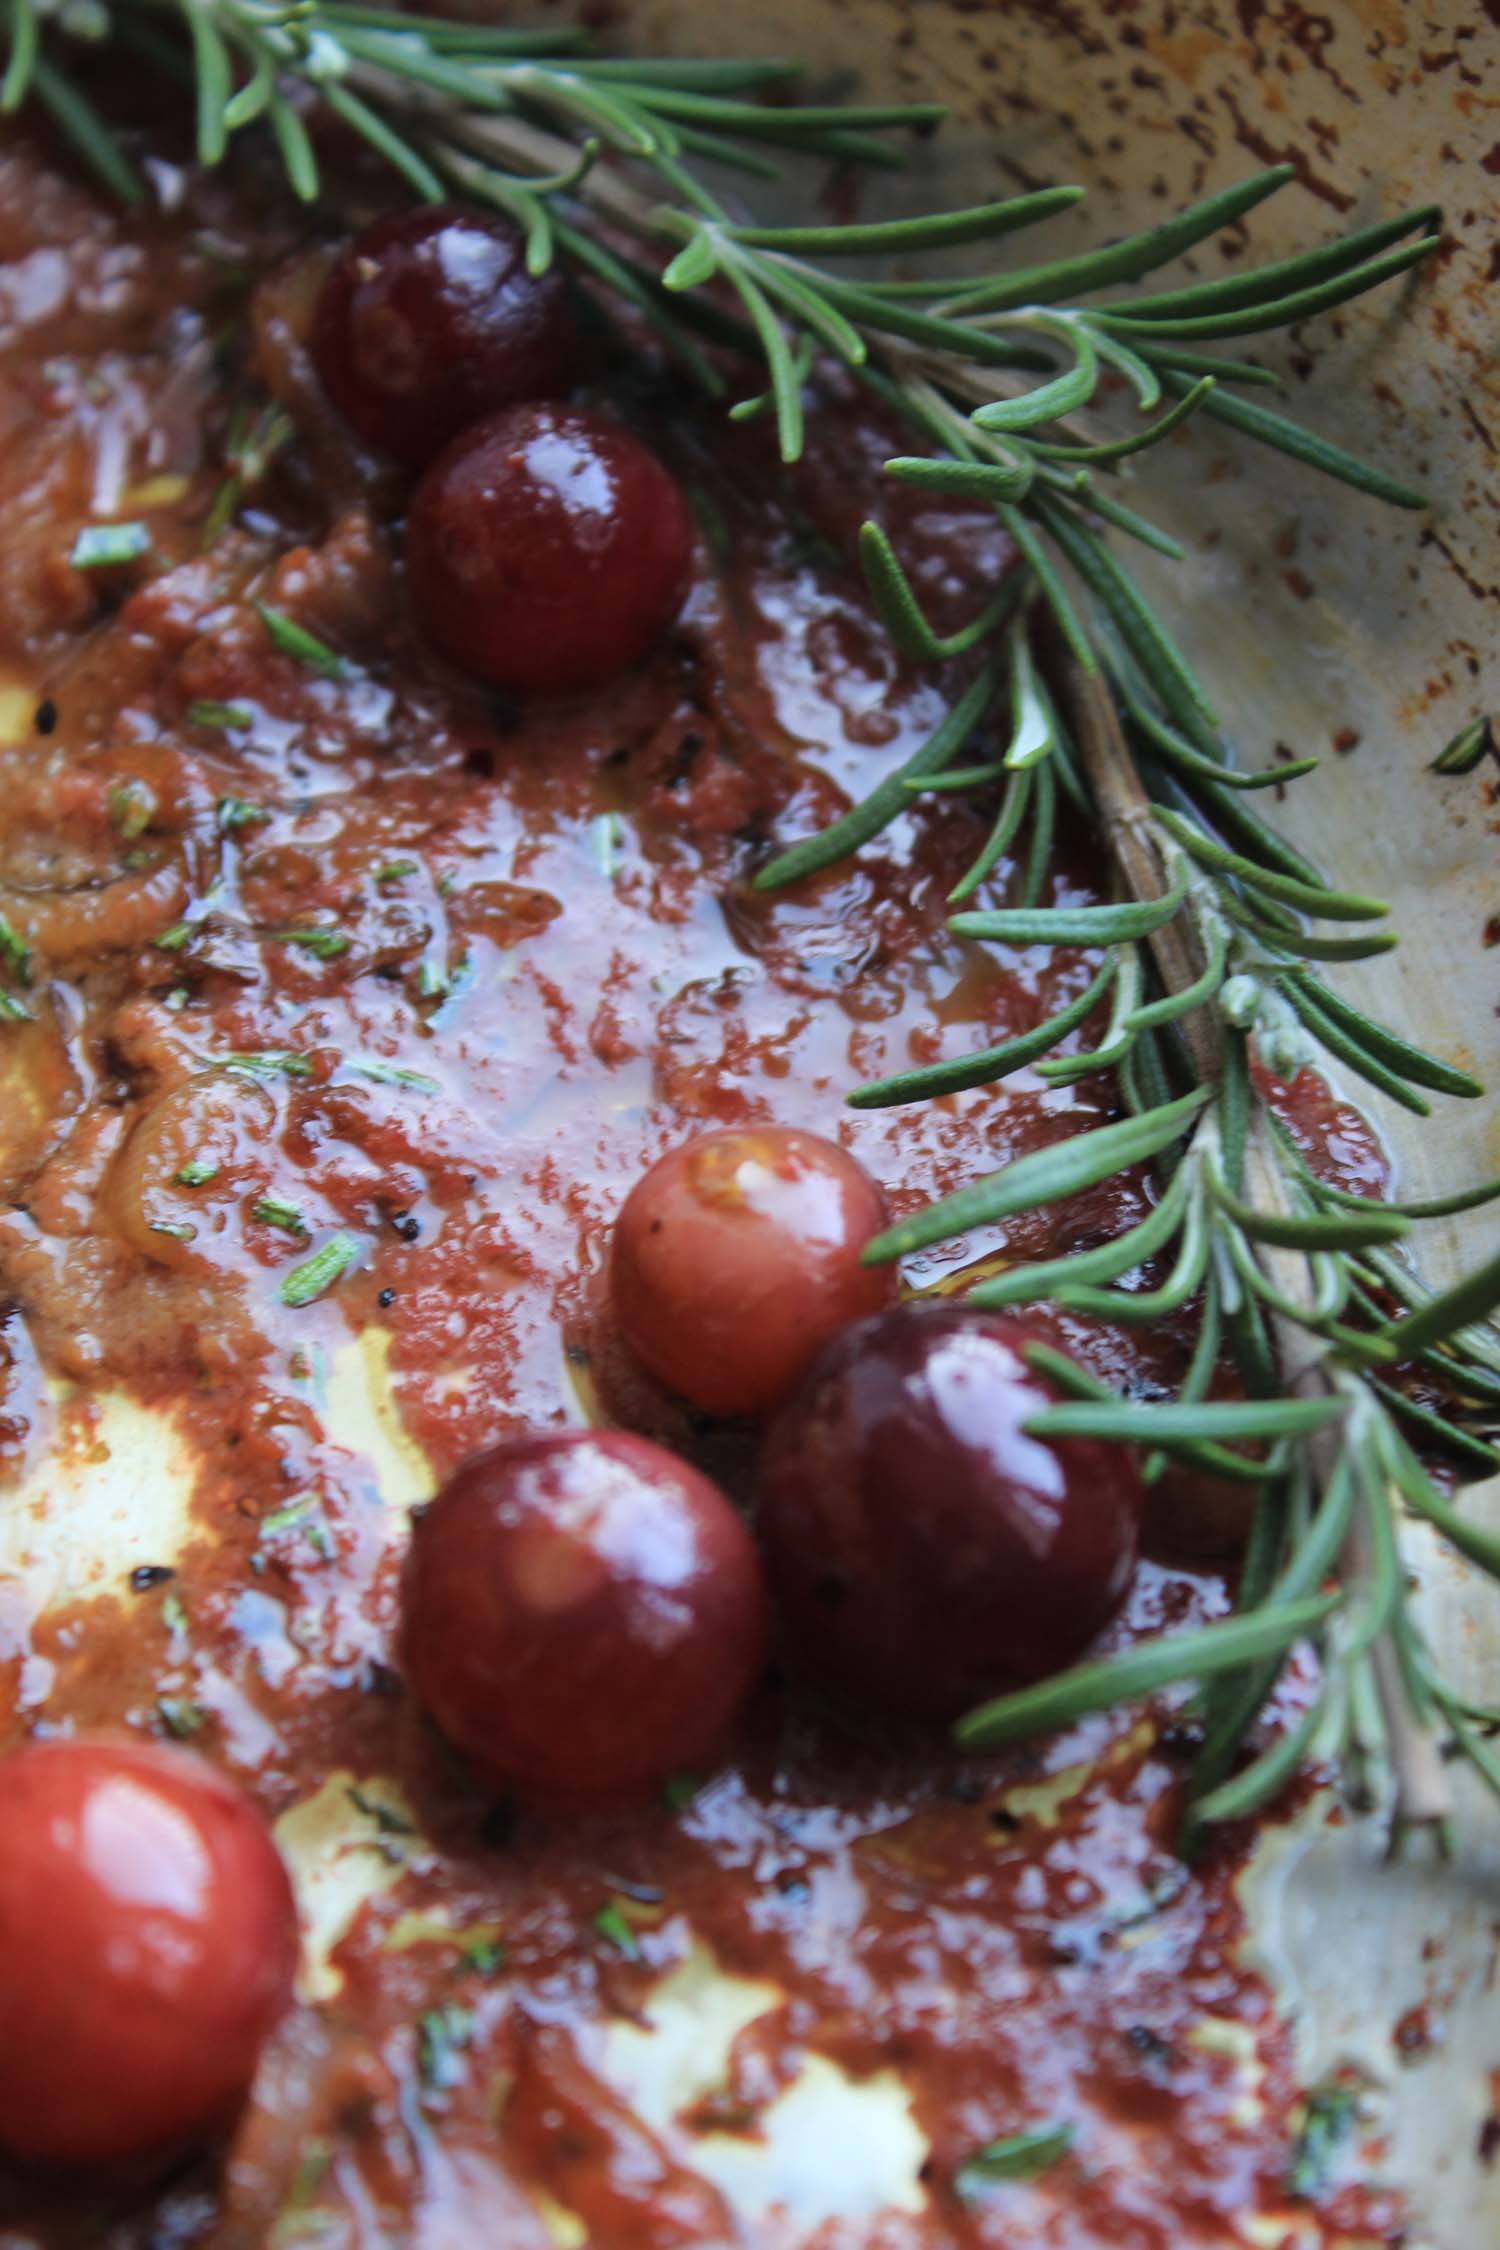
28:44 – Finishing touches to the chicken as Michael and Ina make a sauce from the chicken drippings grape juice and figs.

29:39 – Dinner time! The chicken looks delicious and according to Ina the flavor is like a sweet and savory taste of fall. Yum!

Final Thoughts:
I love incorporating fruit into savory dishes, so I’m excited to try it with grapes.

The California style of cooking is so distinctively flavorful and simple, definitely bears further investigation….

It’s official: I am dying to get back to Napa!

Chicken a la Vendemmia | Image: Laura Messersmith

Chicken a la Vendemmia | Image: Laura Messersmith

Lessons Learned:
I wanted to try Chicken a la Vendemmia for a few reason – first: we really liked the flavor of the grapes in the Roasted Sausages and Grapes and second, some of the ingredients reminded me a lot of these Pickled Grapes from the Lee Brothers. All good news as far as I was concerned.

Sautéing the Chicken – This is a technique I’ve been practicing now for the past year and I’m just now starting to feel confident in my ability to get really crispy flavorful skin while maintaining juicy tender meat. A lot of credit goes to pan temperature – getting the pan and then later the olive oil really quite hot is key. Remember that shimmer I mentioned? That comes into play here too.

Reducing the Sauce – Definitely “toast” the rosemary a little before adding the grape juice to help mellow the flavor of the herb and infuse the sauce. After that, reducing the fresh grape juice just takes a little patience and a little stirring, but the resulting concentration of sweet and tart sauce is worth it.

Herbs – Rosemary is pretty straightforward, but fennel spice was a little beyond what we had on hand and frankly I forgot to see if the grocery store here carries it. No matter though, I find that tarragon and fennel have a similar “green” anise flavor, so I made a one-to-one substitution with dried tarragon and the outcome was still delicious.

Chicken a la Vendemmia | Image: Laura Messersmith

Chicken a la Vendemmia | Image: Laura Messersmith

Small Kitchen Friendly?
Yes, assuming you have a blender or food processor. I used a blender, a small mesh sieve, medium cutting board, chef’s knife, and a medium sauté pan. I also needed tongs, a rubber spatula, and measuring cups and spoons.

The Verdict:
I made Chicken a la Vendemmia for Mike and I earlier this week and Mike, as you might have suspected, will always ask for more spice. If that’s you too, I’d suggest taking the red pepper flake inspiration from the Lee Brother’s pickle recipe and incorporating it at the same time you add the rosemary to the sauté pan. I also added a handful of fresh whole grapes in the last few minutes for some textural interest. This recipe has a lot to recommend it – simple ingredients, big concentrated flavors, and processes that make even the saddest wintertime grape sing.

Chicken a la Vendemmia | Image: Laura Messersmith

Chicken a la Vendemmia | Image: Laura Messersmith

Pear Cranberry Crostata

Pear Cranberry Crostata | Image: Laura Messersmith

Pear Cranberry Crostata | Image: Laura Messersmith

Each week I follow along with Ina Garten (aka the Barefoot Contessa) and attempt to recreate one of her dishes in my tiny New York City kitchen. The catch? This is my version of cooking school and I’m making these recipes for the first time. I’ll share both my successes and um, challenges, along the way and we’ll see if I can keep up with the Contessa!

Episode: “Training Day Dinner”

The Set-up: Ina and Chef Joe Realmuto have offered to help make dinner for the East Hampton volunteer firefighters.

The Menu: Grilled Bread with Prosciutto, TownLine BBQ Pork Ribs, Sandy’s Potato Salad, Pear and Cranberry Crostata

0:42 – Ina is starting us off with Pear and Cranberry Crostata which she chose because it’s served room temperature, can be easily transported and is “absolutely delicious.” Good call on all three.

1:36 – I kind of assumed that crostata was basically a flatter version of a pie, but I notice that Ina isn’t putting any spices in with the diced pears, just a little orange zest.

2:05 – Pastry time, this recipe is a little different than the one she recommended for pie – it’s butter only, no vegetable shortening – and seems a bit softer.

3:28 – A quick intro to the East Hampton Volunteer Fire Department (est. 1975), so we know why this dinner is so important.

4:41 – Back with Ina to make the topping for the crostata – cinnamon, butter, allspice, sugar – and I ask myself, “How bad could that be?”

5:52 – These look seriously delicious and I can tell already that this is the recipe I want to make.

6:39 – I’m watching Ina intently as she finishes the final assembly – especially the crust folding technique – I think this maybe where the magic happens.

7:57 – Of course she makes it look so simple, but there must be a trick, right? I’m noticing no egg wash either which seems standard for getting golden brown pastry…

10:14 – Ina has rolled up to the EHVFD in an emergency vehicle of her own – emergency dessert.

11:23 – We get a little overview of the preparations underway, buffet tables, grill assembly, and Ina’s partner in crime: Chef Joe Realmuto.

12:45 – Ina heads upstairs to cook with Sandy, mastermind of Sandy’s Potato Salad, and Ina is put to work chopping hard boiled eggs.

13:16 – Sandy tells Ina that this is an old fashioned Southern recipe from her family tradition and I believe it – any mayonnaise based salad that also calls for pickle relish has got to be straight off the picnic table.

14:35 – Ina and Sandy have a heart to heart about how cooking is only kind of a science, since even the same ingredients vary in flavor. True story, sometimes you do everything the same and it just turns out differently!

15:28 – Taste test time and Ina approves of this “really old fashioned potato salad.”

20:34 – We’re outside at the giant grills set up for Chef Realmuto’s ribs which start with a dry rub of paprika, salt, sugar, ground mustard, chili powder, cumin, black pepper, garlic powder, and cayenne. Mike is a huge barbecue aficionado I wonder if he would approve of this recipe?

21:53 – Step Two of the process involves a “Texas mop”, a term I’ve never heard before, and it looks like a miniature version of a rope mop used for floors, except this one is used to baste the ribs every half hour.

22:15 – A little research tells me that “Texas mop” could also be referring to the basting sauce itself.

23:47 – Joe apparently made these ribs in a smoker at his restaurant and is just using the grill to re-heat. I’m relieved to hear that my fellow Yankees haven’t confused “grilling” with “barbecue.”

26:36 – Over to Ina who is making Grilled Bread with Prosciutto as an appetizer while Joe sets up giant platters of ribs.

27:50 – Yum. Ina is used smoked mozzarella on top of the prosciutto – I love smoked cheeses. My stomach is growling.

28:21 – Training is over and the buffet table is laden with all sorts of salads including Sandy’s Potato Salad, of course.

29:32 – The crostata is served and the cooking team celebrates with a round of high-fives!

Pear Cranberry Crostata | Image: Laura Messersmith

Pear Cranberry Crostata | Image: Laura Messersmith

Final Thoughts:
I Googled “crostata” and “galette” - turns out they’re the same thing in different languages (Italian and French.) Cue the “The More You Know” star…

I feel like crostatas might really be my jam. #sorrynotsorry in advance for the influx of crostata recipes I’ll be posting.

I love how involved Ina is with her local community – I swear she’s always volunteering or donating her time.

Lessons Learned:
Dough – I’m trying to reach some level of comfort with pie crust and after my last attempt with Deep Dish Apple Pie where the dough was too dry I was hyperaware of adding enough water. I think I actually overdid it since the result was pretty sticky, but it seemed a little more forgiving once a fair amount of additional flour was incorporated during the rolling out process. I noticed that because the dough was a little soft that my crostata edges were prone to falling down, but I have confidence that one of these days I’ll get it right!

Fruit – The original recipe called for “big chunks” of pear, but the ones I was had were a little under-ripe and since I was making mini versions I cut them a little smaller. This ended up being just perfect – the fruit was definitely cooked, but still firm pieces. I’d love to try this recipe again with fresh cranberries since the dried ones ended up a little dark and I don’t know how much of the flavor came through. I also forgot the orange zest, but it didn’t seem to matter much.

Assembly – I cut this recipe in half and then made three mini crostatas instead of one medium sized one. All the proportions still worked perfectly and as I was finishing the assembly process I decided to brush them with egg wash and sprinkle a little turbinado sugar – all good choices that I’d recommend!

Pear Cranberry Crostata | Image: Laura Messersmith

Pear Cranberry Crostata | Image: Laura Messersmith

Small Kitchen Friendly?
Yes, assuming you have a medium sized food processor. I also used a large cutting board, chef’s knife, vegetable (in this case fruit) peeler, rolling pin, dry & liquid measuring cups, measuring spoons, a baking sheet, and a medium bowl. I needed a small bowl and a pastry brush for the egg wash; plastic wrap and parchment paper rounded out the “kit.”

The Verdict:
I put these mini Pear and Cranberry Crostatas out as a mid-afternoon snack for some friends and when it was time to go there was just one lonely quarter leftover. Shockingly, it took zero convincing to get someone to help out with that last piece. I personally love the sweetness of the pears with the tart cranberries and how the crust gets beautifully crisp; which means these can be eaten “politely” with a fork or just picked right up like a slice of pizza. I also have full leave from Mike to make these anytime. Color me a crostata convert.

Pear Cranberry Crostata | Image: Laura Messersmith

Pear Cranberry Crostata | Image: Laura Messersmith

Steak with Béarnaise Sauce

Steak with Béarnaise | Image: Laura Messersmith

Steak with Béarnaise | Image: Laura Messersmith

Each week I follow along with Ina Garten (aka the Barefoot Contessa) and attempt to recreate one of her dishes in my tiny New York City kitchen. The catch? This is my version of cooking school and I’m making these recipes for the first time. I’ll share both my successes and um, challenges, along the way and we’ll see if I can keep up with the Contessa!

Episode: “Happy Anniversary”

The Set-up: Ina and Jeffrey are celebrating their 35th wedding anniversary with a special dinner.

The Menu: Rosemary Roasted Potatoes, Shrimp with Cocktail Sauce, Steak with Béarnaise, String Beans with Shallots

0:39 – Ina starts this episode by making two statements – first that Jeffrey is a “creature of habit” and second that Shrimp with Cocktail Sauce is a “fairly 70s” dish. I can’t speak to the veracity of these claims, so I’m just going to roll with it.

1:03 – Pro Tip #1: if you’re poaching your own shrimp, leave the shells on and cook them for three minutes in boiling water. It‘s all the time they need.

2:18 – Cut to Mr. Garten driving along and expounding on the importance of anniversaries and admitting that he forgot their 20th. I hope Ina made him sleep on the porch.

3:20 – Back to Ina peeling and deveining the shrimp (tails on.) She says that even though shrimp cocktail is “really old-fashioned” it’s the first thing to go at a party. Guilty as charged. I make a beeline for it.

4:33 – On to the cocktail sauce part of the recipe. I thought I had made this before, but as I review the ingredients list I’m realizing I’m totally unfamiliar with chili sauce.

5:11 – Back to Mr. Garten who is on a mission to bring Ina a box of brownies just like she used to send him in college. So sweet!

6:07 –Ina is hating on the old martini glass, crushed ice presentation. Guess what first Google image search result for shrimp cocktail is… I guess they were taking the name literally?

7:25 – She plates her dish using a silver bowl on a white platter, but isn’t above cutting a lemon into a retro-chic garnish. I suppose we all have to have fun somehow.

10:29 – On to the Rosemary Roasted Potatoes which if you’ve been following along for the past year involve the standard olive oil, kosher salt, black pepper, and in this case, minced rosemary. I seriously cook 90% of the vegetables we eat this way now.

11:36 – Over to Jeffrey who’s hitting up Michael the Florist TM for some ribbon to jazz up the box of brownies with. Good call, J, always enlist help!

12:45 – Ina has moved on to the Steak with Béarnaise starting with the sauce – white wine, champagne vinegar, tarragon – sounds good to me!

13:38 – Ina separates her eggs same the way I do by using the shells as little cups. Twinsies!

14:40 – Raw egg yolks + hot vinegar/white wine/tarragon/shallots + hot butter = béarnaise. Hmm. Usually adding hot things to eggs is a no-no, but the blender must prevent them from scrambling?

15:51 - It strikes me that this kind of recipe where the steps themselves aren’t that tricky, but the order is essential.

18:27 – Pro Tip #2: Remove the steaks from the refrigerator a few minutes before you intend to cook them to take the chill off the meat.

19:12 – Steak grillin’ time! Jeffrey’s grill-lighting activities are accompanied by the “getting things done” music. Charcoal chimney: check.

20:36 – Ina brushes the steaks with olive oil and then goes out to the patio to manage the grilling (read: tease Jeffrey) and then immediately abandons him to cook the main course. Ahahahaha.

21:44 – Ostensibly it’s so she can go inside to show us how to make String Beans with Shallots, so I’ll let it slide. This time.

22:18 – For a simple haricot vert this recipe requires a lot of equipment – a pot of boiling water, a bowl of ice water, a large skillet. Remind me to save this one for when we have a bigger kitchen!

23:33 – Jeffrey seems to be muddling along with the rib eyes pretty well and Ina does have some good-looking green beans. Dinner is coming together!

26:21 – Out on the terrace again to deliver the Shrimp with Cocktail Sauce – sustenance for Jeffrey as he grills, seems pretty fair now I guess.

27:10 – Actual “secret sauce” time as Ina reveals that the trick to make-ahead béarnaise is a few tablespoons of very hot water blended in at the last minute. Very tricky…

28:49 – Rosemary Roasted Potatoes are out of the oven, looking perfectly golden brown, steaks are off the grill and rested. It’s time to eat!

29:55 – As Ina teases Jeffrey about the time he forgot their anniversary over dinner he reveals the surprise: a walk on the beach and the box of brownies! So charming! 

Steak with Béarnaise | Image: Laura Messersmith

Steak with Béarnaise | Image: Laura Messersmith

Final Thoughts:
It’s amazing how some of the simplest dishes (I’m looking at you string beans) can have so many steps!

Ina has such a great way of de-mystifying seemingly fancy recipes.

I’m thinking this might be a great Valentines Day meal – just add a glass of red wine?

Lessons Learned:
Talk to the Butcher – I’m always looking for excuses to practice cooking steak, but it’s also intimidating. After spending $$$ on a cut I worry that I’ll mess it up! I figured, who knows steak better than the butcher? So, I had a long conversation with Ritchie at Schatzie's about my plan to make Steak with Béarnaise and he recommended buying two different pieces: a 1 inch thick ribeye and a 1 1/2 inch thick NY Strip. This solved three problems - portion size, cooking time, and "doneness" - it allowed me to cook both pieces of meat for the same length of time and get one medium for me, and one medium-rare for Mike.

Pan Temperature – The steak is the star of this dish, so cooking it properly is essential and also honestly the trickiest part. I used an 8 inch cast iron skillet heated over high flame for 4-5 minutes before the steak even hit the surface. You want to hear that ssssssss sizzle sound. The length of time depends on the thickness of the steak and your desired internal temperature. A 1 inch steak cooked for three minutes on each side yields a medium (hot red) center.

Sauce Reduction – To get the right texture of the béarnaise sauce the vinegar/white wine/tarragon/shallot mixture should be reduced to about 2 tablespoons. It serves two purposes – concentrating the flavor and making sure the béarnaise sauce isn’t too thin.

Steak with Béarnaise | Image: Laura Messersmith

Steak with Béarnaise | Image: Laura Messersmith

Small Kitchen Friendly?
Yes, assuming you have a small food processor or blender. I also used an 8 inch cast iron skillet, a chef’s knife, medium cutting board, small sauce pan, liquid measuring cup, and measuring spoon.

The Verdict:
I made Steak with Béarnaise for Mike and I – thanks to the excellent advice from Ritchie both steaks turned out just the way we like them. The béarnaise sauce is just slightly fussy, but thanks to Ina’s make-ahead hot water trick I made some earlier in the day refrigerated it and it still turned out beautifully. Steak with Bearnaise might not sound like a week-night meal, but it honestly takes less than 30 minutes start to finish and, btw it’s delicious.

Steak with Béarnaise | Image: Laura Messersmith

Steak with Béarnaise | Image: Laura Messersmith

Peanut Butter Marbled Bars

Peanut Butter Marbled Bars | Image: Laura Messersmith

Peanut Butter Marbled Bars | Image: Laura Messersmith

I’m guessing I first had a Peanut Butter Marbled Bar in seventh grade or so. My dear friend Kate’s mom used to send them in her lunch from time to time and at some point I must have requested the recipe (even then I knew a good thing when I tasted it.) The original, wide ruled piece of notebook paper with Kate’s neat handwriting is still in the highly organized pile of recipes at my parent’s house; evidence of heavy use in its creased, crumpled and smudged state.

There’s a reason that recipe is so well worn; it’s absolutely delicious, requires no special equipment, no special ingredients, and, truthfully, not a lot of baking expertise. Peanut butter lovers take note this is a direct line to a dense peanut butter cookie swirled with melted chocolate – the perfect balance of salty and sweet – and it all gets baked in a 9x13 pan.

I made these for our holiday party a few weeks ago, and based on the lack of leftovers I can promise you that they will be popular for any Super Bowl gathering or bake sale on your horizon. Maybe pull out a few sheets of notebook paper for recipe requests and make thirteen-year old me proud.

Peanut Butter Marbled Bars | Image: Laura Messersmith

Peanut Butter Marbled Bars | Image: Laura Messersmith

Peanut Butter Marbled Bars (yield: 1 dozen 3 inch bars)

Ingredients:
1/2 cup (1 stick) butter, room temperature
3/4 cup light brown sugar
3/4 cup granulated sugar
1/2 cup peanut butter (smooth or crunchy, baker’s choice!)
2 eggs, room temperature
2 teaspoons vanilla
1 teaspoon baking powder
1 cup all purpose flour
1/4 teaspoon kosher salt
12 ounces (1 bag) semi-sweet chocolate chips
Non-stick spray

Instructions:
Pre heat the oven to 350 degrees.

In a medium bowl, cream together the softened butter, sugar, and brown sugar until light and fluffy. The butter should be softened to room temperature - not melted, definitely not cold. A hand mixer will help, but isn’t necessary. Next mix in the peanut butter until well combined. Stir in the eggs and vanilla, don’t over mix.

In a separate small bowl, sift together the all purpose flour, baking powder, and salt. Stir the dry ingredients into the peanut butter mixture until combined.

Spread the batter in a greased 9x13 inch pan. Sprinkle the semi sweet chocolate chips evenly across the top of the batter. Place the pan in 350° oven for 3-5 minutes until the chocolate chips are softened and beginning to melt.

Remove the pan from oven and run a knife through the softened chocolate chips create a marble pattern of thick swirls. Less is more here - the point is not to mix the chocolate in, but to have ribbons through each bar.

Return to the pan to oven and bake for another 20-25 minutes until a toothpick comes out clean. Cool thoroughly and cut into bars.

Adapted and rewritten from Nestle Toll House

Peanut Butter Marbled Bars | Image: Laura Messersmith

Peanut Butter Marbled Bars | Image: Laura Messersmith

Small Kitchen Friendly?
Yes! I used a glass 9x13 inch pan, 1 medium mixing bowl, 1 small bowl, dry measuring cups and spoons. I also used a wooden spoon, rubber spatula, and a butter knife.

The Verdict:
I have Mike’s permission to make Peanut Butter Marbled Bars anytime, no seriously anytime. When I put out the platter of these as a dessert option for our party they went like proverbial hotcakes. And why wouldn’t they? Peanut butter and chocolate is a classic combination for a reason.

Peanut Butter Marbled Bars | Image: Laura Messersmith

Peanut Butter Marbled Bars | Image: Laura Messersmith

Peanut Butter Marbled Bars | Image: Laura Messersmith

Peanut Butter Marbled Bars | Image: Laura Messersmith